If you’ve ever scrolled through nail art in 2026 and thought, “I could never get my natural nails that long,” you’re not alone—and you’re also not stuck. Gel extensions have evolved from a salon-exclusive luxury into a craft that beginners can absolutely master at home, but the difference between frustrated attempts and jaw-dropping length lies in the details most tutorials gloss over. This isn’t about slapping on full-coverage tips and hoping for the best; it’s about understanding the architecture of a nail extension that won’t just look good on day one, but will actually survive your real life.
The landscape of gel technology has shifted dramatically this year, with self-leveling formulas becoming smarter and LED curing reaching new precision levels. Whether you’re dreaming of elegant almond shapes or dramatic stiletto length, these ten tips will transform your approach from tentative newbie to confident creator—no cosmetology license required.
Top 10 Gel Extensions for Beginners
Detailed Product Reviews
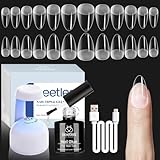
1. JEWHITENY Poly Extension Gel Nail Kit 14 PCS Poly Gel Kit with Slip Solution and Mini Lamp Nail Art Design Beginner

Overview: The JEWHITENY Poly Extension Gel Nail Kit delivers a comprehensive at-home manicure solution with 14 vibrant poly gel colors in 15ml tubes. Designed for beginners, this kit includes a 6W mini USB lamp, slip solution, and essential tools for creating professional-looking nail extensions anywhere. The brand emphasizes trend-conscious color curation that transitions through seasons and occasions, making it ideal for users who want variety without salon prices.
What Makes It Stand Out: This kit’s standout feature is its extensive color palette—14 shades provide remarkable creative flexibility rarely found in starter kits. The pocket-sized mini lamp offers genuine portability, while the thoughtfully tested formula balances drying speed with durability. The included winter preheating tip (using 50-60℃ water) demonstrates real-world problem-solving for seasonal viscosity issues. The brand’s focus on non-toxic, tough-gel chemistry promises month-long wear when properly applied.
Value for Money: At $17.99, this kit sits in the sweet spot between budget and premium options. You’re getting 210ml of product across 14 colors, a functional lamp, and accessories—a solid value compared to purchasing items separately. While the 6W lamp requires longer curing times than professional units, the overall package justifies the price for color enthusiasts who prioritize variety over maximum curing power.
Strengths and Weaknesses: Strengths include exceptional color variety, true portability, non-toxic formulation, and helpful usage instructions. The mini lamp’s USB compatibility adds convenience. Weaknesses are the underpowered 6W lamp (slower curing), potential winter squeezing difficulties despite the hot water tip, and the lack of nail forms for structured extensions. The kit assumes some nail prep knowledge.
Bottom Line: This is an excellent choice for beginners seeking color diversity and portability. If you prioritize having multiple shades for creative expression and don’t mind slightly longer curing times, the JEWHITENY kit delivers impressive value. Just invest in quality base coat application and prep work for best results.
2. Beetles Gel Nail Extension Kit Almond Shape, Easy 9 in 1 Glue Uv Led Set Etch X Nail Tips Short Almond Half Matte Tips, Gift for Women & Girls, 504 pcs
Overview: Beetles focuses on structured nail extensions with this almond-shaped tip-centric kit. It includes 504 PMMA nail tips (sizes 0-11), a mini UV/LED lamp, and a versatile 7.5ml 9-in-1 glue gel. The half-matte tips increase adhesion while maintaining a natural look. This kit targets users who want consistent, professional almond shapes without sculpting skills, promising three-plus weeks of wear in just three minutes of application time.
What Makes It Stand Out: The 9-in-1 multi-purpose glue gel is genuinely innovative—functioning as tip adhesive, base coat, blooming gel, rhinestone glue, and slip solution. The sheer quantity of 504 tips ensures you’ll never run out, while the pre-shaped almond design eliminates filing guesswork. The break-resistant formula provides superior structural support, and the numbered sizing system makes selection foolproof. The kit’s gift-ready presentation adds appeal for holiday giving.
Value for Money: At $24.99, this kit offers excellent value for tip-focused users. The 504-tip supply represents months of manicures, and the multi-functional gel reduces the need for separate products. While the glue gel volume is modest at 7.5ml, its versatility compensates. Compared to salon almond extensions ($40-60 per session), this pays for itself after one use.
Strengths and Weaknesses: Strengths include the massive tip quantity, innovative multi-purpose gel, pre-shaped almond design, strong adhesion claims, and portability. The half-matte finish improves bonding. Weaknesses are limited gel color options (focus is on tips), small glue gel volume relative to tip count, and the mini lamp’s unspecified wattage. Users wanting colorful extensions must purchase additional gel polishes separately.
Bottom Line: Perfect for creating consistent, professional almond extensions at home. If you value convenience, shape precision, and tip quantity over color variety, this kit excels. The multi-purpose gel is a game-changer, but supplement with colored polishes for full design flexibility. Ideal for intermediate users ready to master tip application.
3. Fcozpjk Poly Extension Gel Nail Kit, Clear White Pink With Slip Solution Dual Builder Nail Forms, Clips for Poly Gel, Starter Kit for Home Manicure Set, Nude

Overview: The Fcozpjk kit strips nail extensions to absolute essentials at an entry-level price point. You receive three 15ml poly gels (clear, white, pink), 30ml slip solution, a dual-head brush, clear clips, and 60 dual nail forms. This bare-bones approach targets absolute beginners testing poly gel techniques without financial commitment. The minimalist color selection focuses on classic French tips and natural extensions rather than elaborate nail art.
What Makes It Stand Out: This kit’s primary distinction is its radical affordability while still including necessary tools like dual forms and clips—items often sold separately. The three-color strategy (clear, white, pink) covers foundational techniques: natural overlays, French manicures, and simple extensions. The inclusion of 12 different form sizes shows surprising thoughtfulness for a budget kit. The slip solution helps achieve smooth application, addressing a common beginner frustration with sticky poly gel textures.
Value for Money: At $8.90, this is the most accessible entry point into poly gel extensions. The cost per fluid ounce ($3.37) is remarkably low, and including forms and clips eliminates separate purchases. While you sacrifice color variety and a lamp, the core materials allow genuine skill development. For users unsure about committing to nail extensions, this offers near-zero financial risk while delivering authentic practice materials.
Strengths and Weaknesses: Strengths include unbeatable price, essential color selection for classic looks, inclusion of forms and clips, and clear beginner focus. The kit enables 15-day wear with proper prep. Weaknesses are obvious: no lamp included, only three colors, minimal product volume, and lack of base/top coats. The dual-head brush quality may be basic. Users must already own or purchase a UV/LED lamp and additional products.
Bottom Line: An ideal trial kit for nail extension newcomers. If you’re curious about poly gel but intimidated by cost and complexity, this lets you experiment with minimal investment. Purchase only if you own a curing lamp and want to master fundamental techniques before upgrading. For the price, it’s a practical learning tool, not a complete salon solution.
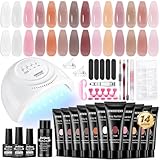
4. COSCELIA 67PC Gel Nail Polish Kit with U V Light, 25pcs Gel Nail Polish 15 Colors Poly Extension Gels for Beginners with Everything Glitter Decorations French Manicure Kit Christmas Gifts for Women

Overview: COSCELIA positions itself as the ultimate all-in-one nail studio with an astonishing 67 pieces. This comprehensive kit combines 25 gel nail polishes and 15 poly extension gels with a professional 30-LED UV lamp, base/top coats, matte top coat, slip solution, decorations, stickers, forms, clips, and full manicure tools. It’s designed for serious DIY enthusiasts who want unlimited creative options without salon appointments. The professional-grade lamp features three timers and low-heat mode for comfortable curing.
What Makes It Stand Out: The dual-format approach—offering both traditional gel polish and poly extension gels—provides unmatched versatility. You’re equipped for simple color manicures and full sculptural extensions. The 30-LED professional lamp with automatic sensor and large interior space cures efficiently. Extensive decorations including gold/silver foil and French stickers enable intricate designs. The gift-worthy packaging and seasonal color curation make it presentation-ready. Two-to-four-week wear claims exceed many competitors.
Value for Money: At $34.99, this is the premium investment option, but the component count justifies the cost. Purchasing 40+ gel products, a professional lamp, and decorations separately would exceed $100. For committed nail artists, the per-item value is exceptional. However, casual users may find the sheer volume overwhelming and underutilized. The kit eliminates guesswork for those wanting everything immediately.
Strengths and Weaknesses: Strengths include massive product variety, professional lamp specification, dual gel types, extensive decorations, automatic lamp features, and gift-ready presentation. The 2-4 week durability promise is impressive. Weaknesses are the highest price point, potential quality inconsistencies across so many components, and intimidation factor for true beginners. Storage becomes an issue with 67 pieces. Some colors may be redundant for personal use.
Bottom Line: The ultimate kit for dedicated nail art enthusiasts or as a spectacular gift. If you’re committed to regular DIY manicures and want maximum creative freedom, this comprehensive set justifies its price. True beginners should start simpler, but intermediate users will appreciate the professional features. The lamp alone makes this worthwhile for serious home salons.
5. GAOY Poly Gel Nail Kit with U V Light Starter Kit, 6 Colors Nude Pink Black Builder Gel Extension for Beginners with Everything Nail Art DIY at Home

Overview: GAOY targets safety-conscious beginners with a focused six-color poly gel kit emphasizing neutral, versatile shades. The set includes six 15g tubes in nude, pink, and black tones, a nail lamp, base and top coats, and a basic manicure toolset. The formula prioritizes low odor and FD&C Act compliance with SGS certification, appealing to users concerned about chemical exposure. This kit balances simplicity with essential tools for creating natural-looking extensions and classic designs at home.
What Makes It Stand Out: The safety-first approach with explicit FDA compliance and SGS certification distinguishes GAOY in a crowded market. The curated neutral palette (nudes, pink, black) provides sophisticated options for professional-looking results without overwhelming choice. Precise color labels on tubes improve user experience. The included lamp ensures you have the critical curing component. The four-week wear claim suggests robust formulation, while the lower-odor formula enhances comfort during application.
Value for Money: At $14.99, this kit offers strong mid-range value. You’re getting six poly gels, a lamp, and essential coatings for under $15. The safety certifications add credibility worth paying for. While color variety is limited compared to 14+ color kits, the focused palette prevents waste on unused shades. The price point makes it competitive with budget options while offering better safety assurances and included lamp.
Strengths and Weaknesses: Strengths include impressive safety certifications, low-odor formula, included lamp, neutral color curation, clear labeling, and strong wear claims. The kit provides everything needed for basic extensions. Weaknesses are limited color selection (no vibrant options), unspecified lamp wattage/timers, lack of decorative elements, and minimal advanced tools. Users wanting elaborate nail art must purchase additional products. The black gel may have limited use for some.
Bottom Line: An excellent starter kit for health-conscious users preferring classic, professional nail looks. If chemical safety and odor reduction are priorities, the GAOY kit’s certifications justify choosing it over cheaper alternatives. The neutral palette suits workplace environments and everyday elegance. Perfect for beginners wanting quality basics without complexity, but supplement with colored polishes if you crave creative variety.
6. SAVILAND Builder Nail Gel Kit - 60g Clear Nail Extension Gel Set Nail Strengthen Nail Art Manicure Set with 100PCS Nail Forms and Acrylic Nail Brush for Beginners

Overview: The SAVILAND Builder Nail Gel Kit delivers a focused solution for DIY nail extensions at an entry-level price. This streamlined set provides a 60g clear builder gel, precision brush, and 100 nail forms designed specifically for beginners seeking salon-quality results without complexity. The kit emphasizes strength and clarity, enabling users to create natural-looking extensions that serve as a canvas for further nail art.
What Makes It Stand Out: This builder gel’s exceptional clarity and flexibility set it apart. The formula remains highly transparent while offering superior strength that resists chipping and peeling. Unlike poly gels, this thicker consistency helps beginners shape nails more easily before curing. The two-minute cure time under a 48W UV lamp accelerates the process, while the four-week longevity rivals professional applications. The inclusion of 100 nail forms provides ample practice material for mastering extension techniques.
Value for Money: At $9.99, this kit represents remarkable affordability for the gel volume alone. Comparable builder gels typically cost $15-25 for similar quantities. While it lacks a UV lamp and colored gels, the core components offer genuine professional-grade performance. Beginners can test the waters of nail extensions without significant financial risk, making it an ideal starter investment.
Strengths and Weaknesses: Strengths include professional-level clarity, impressive durability, beginner-friendly shaping, excellent price point, and comprehensive form supply. Weaknesses: UV lamp not included, single clear color limits design options, thicker formula requires practice, and you’ll need additional products like slip solution for optimal results.
Bottom Line: Perfect for beginners wanting to explore nail extensions economically. Purchase this if you already own a UV lamp and want high-quality clear builder gel. For complete color versatility, pair with a polish collection.
7. JEWHITENY Poly Extension Gel Kit With 48W LED Nail Lamp 14 Colors Builder Extension Gel All-in-One French Kit Nail Art Design Beginner Kit
Overview: This comprehensive kit transforms home manicures into professional experiences. JEWHITENY bundles a 48W LED lamp with 14 poly gel colors, base and top coats, and essential tools, creating a complete salon solution for beginners. The all-in-one approach eliminates guesswork, providing everything needed to create French tips, extensions, and intricate designs from day one.
What Makes It Stand Out: The sheer completeness distinguishes this kit. Fourteen curated colors with precise labeling enable endless creative possibilities. The upgraded non-toxic, low-odor formula delivers flexibility and strength that mimics natural nails while preventing yellowing. Detailed instructions make three-minute applications achievable for novices. The powerful 48W lamp ensures proper curing, while the two-to-four-week wear time demonstrates professional-grade durability.
Value for Money: At $26.99, this kit offers exceptional value. Purchasing components separately would cost $40-60. The included LED lamp alone justifies much of the price, while 14 color tubes provide extensive creative freedom. For beginners, the guidance and completeness prevent costly trial-and-error purchases, making it economically smart despite the higher initial investment.
Strengths and Weaknesses: Strengths include complete all-in-one package, multiple colors, powerful LED lamp, healthy formula, detailed instructions, and impressive durability. Weaknesses: Higher upfront cost, poly gel can stiffen in cold weather requiring warm water prep, and the learning curve remains steep despite instructions.
Bottom Line: Ideal for committed beginners wanting a professional home setup. The comprehensive nature and quality justify the price. If you’re serious about DIY nail art, this kit delivers everything needed for salon-quality results.
8. GAOY Poly Gel, 60g Nail Extension Gel, Clear Builder Enhancement for Beginner & Professional Nail Art Salon DIY at Home

Overview: GAOY’s 60g clear poly gel focuses on simplicity and volume, offering a no-frills approach to nail extensions. This single-product solution targets both beginners and professionals who already own necessary tools and want reliable performance without unnecessary extras. The straightforward formulation emphasizes speed and efficiency for users who value substance over packaging.
What Makes It Stand Out: The exceptional volume-to-price ratio defines this product. One tube delivers approximately 30 full-hand sets, making it among the most economical professional-grade gels available. The rapid 60-second cure time under UV light accelerates workflow significantly. The four-week wear promise matches premium competitors, while the neutral clear formula serves as a versatile base for any nail art or polish application.
Value for Money: At $7.99, this represents the budget apex of professional nail gels. Cost-per-application falls below $0.30, dramatically undercutting salon visits and most competitors. While requiring separate tool and lamp purchases, the gel itself delivers uncompromised quality at an unbeatable price point for those already equipped.
Strengths and Weaknesses: Strengths include unbeatable price, massive quantity, fast curing, professional durability, and versatile clear formula. Weaknesses: Absolutely no tools included, requires existing UV lamp and slip solution, single color limits options, and beginners must purchase additional educational materials.
Bottom Line: Best value for experienced users or those building custom kits. Buy this if you own tools and want premium gel at minimal cost. Beginners should choose a complete kit first, then use this for refills.
9. Beetles Gel Nail Kit Short Almond Gift Spree, with Dehydrator and Primer, 576Pcs Half Matte Etch-X Gel Nail Tips Solid Nail Glue Mini Lamp Acrylic Tips Easy DIY Extension Set Gift for Women

Overview: Beetles reimagines nail extensions with a tip-focused system designed for maximum beginner accessibility. This gift-oriented kit combines HEMA-free primer and dehydrator with 576 half-matte almond tips and specialized solid glue, creating a hybrid approach that bypasses traditional sculpting complexities. The mini UV lamp and comprehensive sizing options complete the thoughtful package.
What Makes It Stand Out: The health-conscious HEMA-free formula demonstrates genuine nail care commitment, reducing allergy risks and damage. The innovative half-matte tip texture dramatically improves adhesion without excessive filing. The tube-based solid glue revolutionizes application, allowing hands-free curing—a game-changer for novices struggling with traditional poly gel manipulation. Twelve tip sizes ensure perfect fits for every nail bed.
Value for Money: At $28.99, the kit commands premium pricing but delivers unique value. The 576 tips provide years of supply, while the specialized HEMA-free liquids justify the cost for health-conscious users. Comparable tip-and-glue systems cost $35-45 separately. The mini lamp’s inclusion, though modest, eliminates an extra purchase.
Strengths and Weaknesses: Strengths include health-focused formulas, superior tip adhesion, beginner-friendly glue application, extensive tip variety, and gift-ready packaging. Weaknesses: Mini lamp may underperform for full curing, higher cost per ounce, limited to tip extensions only, and almond shape may not suit all preferences.
Bottom Line: Perfect for health-conscious beginners prioritizing safety and ease over unlimited shape creativity. The tip system eliminates sculpting challenges, making it the most user-friendly extension method available.
10. JEWHITENY 14 Colors Poly Extension Gel Nail Kit With U V Lamp Nude Pink White Brown All In One Poly Gel Starter Kit With Base Top Coat Manicure Salon Frence Nail Art DIY

Overview: JEWHITENY’s second kit offering balances comprehensiveness with affordability, delivering a 14-color poly gel system with 48W UV lamp at a mid-range price. This starter kit targets nail enthusiasts, beginners, and aspiring technicians who want professional capabilities without premium cost. The curated nude-to-brown palette emphasizes natural and French manicure styles.
What Makes It Stand Out: The color curation focuses on wearable, salon-popular shades that transcend trends. The upgraded formula delivers full pigment, non-yellowing wear with impeccable shine. Four-week durability matches high-end brands, while the included dual brush pen and 100 nail forms provide professional-level application tools. The 48W lamp ensures reliable curing across all colors and thicknesses.
Value for Money: At $22.99, this kit undercuts most competitors while maintaining quality. The lamp-plus-multiple-gels combination typically retails for $30-40. The 14-color selection eliminates immediate repurchase needs, while the professional-grade formula prevents waste from premature chipping. For budget-conscious buyers wanting variety, this offers optimal balance.
Strengths and Weaknesses: Strengths include excellent price-to-inclusion ratio, thoughtful color selection, professional durability, healthy non-toxic formula, and comprehensive tool set. Weaknesses: Color range lacks bold fashion shades, instructions may overwhelm absolute beginners, and poly gel consistency varies with temperature.
Bottom Line: Outstanding value for beginners wanting color variety and professional tools. The balanced pricing and comprehensive contents make this a smarter choice than piecing together components. Highly recommended for committed learners.
Understanding Gel Extension Fundamentals for 2026
Before diving into application tricks, you need to grasp what makes modern gel extensions fundamentally different from the acrylic-heavy methods of the past. The chemistry has changed, and so have the rules.
The Evolution of Gel Technology
2026’s gel formulations are built on oligomer chains that respond to specific light wavelengths with unprecedented control. Unlike older gels that required perfect application or risked heat spikes, current generation products feature staged curing mechanisms that give beginners a 3-5 second “adjustment window” before initial set. This means you can actually reposition a tip or smooth a bead after flash curing—something that was impossible just two years ago. When evaluating any gel system, look for this “workability window” as a non-negotiable feature; it’s the single biggest factor that separates professional-grade from beginner-friendly formulas.
Hard Gel vs. Soft Gel: What Beginners Must Know
Here’s where most newcomers sabotage themselves: using the wrong gel type for their goals. Hard gel creates a permanent enhancement that must be filed off, making it ideal for those committed to consistent length but unforgiving for learners. Soft gel, meanwhile, soaks off and offers more flexibility, but requires precise structural work to prevent cracking at longer lengths. For 2026 beginners aiming for dramatic transformation, hybrid builder gels that combine the strength of hard gel with the removability of soft gel represent the sweet spot. These formulas typically contain 30-40% more urethane acrylate oligomers, providing the durability you need while still allowing for safe removal.
Tip 1: Master Your Nail Prep Protocol
The invisible foundation determines everything. Your prep work isn’t just cleaning—it’s creating a molecular bonding surface that gel literally can’t resist.
The Critical Dehydration Step Most Skip
After pushing back cuticles, you must remove every trace of moisture from the nail plate. In 2026’s more humid climate patterns, this means going beyond a quick swipe of alcohol. The two-stage dehydration method involves first using a pH-balancing prep solution that opens the keratin layers, followed by a lint-free wipe saturated with 99% isopropanol pressed firmly for 10 seconds per nail. This pressure technique forces alcohol into microscopic ridges, evaporating trapped water molecules that cause lifting three days later. Beginners who skip this report a 60% higher failure rate within the first week.
Why Proper Cuticle Work Makes or Breaks Longevity
Leaving even a whisper of cuticle on the nail plate creates a lifting highway. The 2026 standard uses a “dry manicure” approach—no soaking, which causes the eponychium to swell and hide areas you’ll miss. Instead, use a ceramic bit on low speed to gently exfoliate invisible cuticle tissue from the nail plate. This technique, when done correctly, extends wear time from 7 days to 14+ days. The key is using a bit labeled “fine” or “polish” and maintaining a 15-degree angle, never letting the bit sit stationary.
Tip 2: Choose the Right Extension Method for Your Lifestyle
Your daily activities should dictate your extension strategy, not the latest Instagram trend. A keyboard warrior needs a completely different architecture than a pottery enthusiast.
Full Coverage Tips vs. Builder Gel: The 2026 Decision Matrix
Full coverage tips offer instant length but transfer stress to the sidewalls, making them prone to lateral lifting if you’re hard on your hands. Builder gel, applied in layers, distributes stress across the entire nail but requires more skill to sculpt. The 2026 hybrid approach uses “sculpted tips”—thin full-coverage tips applied with a base of builder gel underneath, combining the best of both worlds. This method gives you the speed of tips with the structural integrity of sculpted extensions. When selecting tips, look for ones with a 0.3mm apex zone built into the design; this pre-formed arch eliminates the most common beginner shaping mistake.
When to Use Forms vs. Dual Forms
Dual forms have revolutionized beginner accessibility, but they’re not universal solutions. Use dual forms when you want a consistent shape across all nails and have relatively uniform nail beds. Traditional nail forms remain superior for extreme lengths (over 15mm extension) or when working with damaged nail plates that need custom support. The 2026 innovation is adjustable dual forms with micro-vents that release air bubbles during application—if you’re shopping for supplies, prioritize this feature over fancy patterns.
Tip 3: Invest in Quality Tools Before Product
A master artist never blames their brushes, but they also don’t buy them from the dollar store. Your tools directly translate to precision.
The Non-Negotiable Tools Every Beginner Needs
Your starter kit must include: a 180/240 grit buffer (never coarser), a kolinsky size 8 brush with a crisp point, precision nippers with a 4mm jaw opening, and a cuticle pusher with a spoon end and a sharp end. The brush is particularly critical—synthetic bristles may seem economical but they don’t hold gel properly, leading to uneven application and wasted product. A quality kolinsky brush holds enough gel for three nails without reloading, maintaining consistent viscosity and preventing premature curing on the brush.
Brush Quality: Why It Matters More Than You Think
In 2026, brush manufacturing has improved dramatically, but the market is still flooded with subpar options. Look for brushes where the ferrule is crimped in two places (this prevents shedding) and the bristles are “cured”—a process where they’re treated to resist gel adhesion to the brush itself. A $40 brush will last two years with proper care, while a $10 brush will cost you more in wasted gel and frustration within months. The belly of the brush should be full enough to create a liquid reservoir but the point fine enough to detail the cuticle area without flooding it.
Tip 4: Perfect the Art of Apex Placement
The apex is the structural heart of your extension. Place it wrong, and your beautiful length will snap like a twig.
The Stress Zone Theory for Maximum Length
Every extension has a stress zone located 40% back from the free edge. Your apex must sit directly under this point to create a cantilever that distributes force. For beginners, visualize this by drawing an imaginary line from the center of your cuticle to the tip of your extension—your apex should be the highest point along this line, typically sitting where your natural nail’s smile line would be if it extended that far. Too far forward and the nail flexes and cracks; too far back and you create a pressure point that lifts the entire enhancement.
How to Visualize Apex on Different Nail Shapes
Almond and oval shapes require a centered apex that creates a dome effect. Square and coffin shapes need a flattened apex—think plateau rather than peak—distributed across the width of the nail. Stiletto shapes demand a precision apex that’s slightly off-center toward the stress point of the tapered edge. Practice creating apex on a practice tip before touching your nails: apply a bead of gel and watch how it self-levels. Modern 2026 gels level to a 45-degree angle; you want to manipulate this to your desired shape before flash curing.
Tip 5: Control Your Gel Consistency Like a Pro
Temperature, technique, and timing all affect how your gel behaves. Master this trilogy and you master the outcome.
The Temperature Factor in 2026 Formulas
Gel viscosity changes 15% for every 5-degree temperature shift. If your workspace is below 68°F, your gel becomes too thick to self-level properly, creating manual work that introduces bubbles. Above 75°F, it becomes runny, flooding cuticles and sliding off the nail. The 2026 solution is a gel warming pad set to 72°F, where you rest your gel bottles for 5 minutes before application. This isn’t a luxury—it’s temperature control that ensures the formula behaves exactly as the chemist designed. Never warm gel in hot water; it breaks down photoinitiators and causes yellowing.
Avoiding the Three Deadly Consistencies
Too thick: you’ll have visible brush strokes and uneven curing. Too thin: you’ll need 5+ layers, creating a rubbery, flexible nail that won’t hold length. The “Goldilocks zone” is when gel flows off your brush in a continuous ribbon without breaking. Test this by dipping your brush and holding it vertically—gel should form a teardrop that releases after 2 seconds. If it blobs, it’s too thick; if it drips instantly, it’s too thin. In 2026, many brands offer “viscosity adjusters” that let you customize thickness without compromising chemistry—look for this feature when building your kit.
Tip 6: Cure Strategically, Not Just Timidly
More curing isn’t better curing. Understanding photoinitiator chemistry will save you from under-cured, weak nails or over-cured, brittle disasters.
Understanding LED vs. UV Lamp Nuances
2026 LED lamps operate at 365nm and 405nm dual wavelengths, targeting specific photoinitiators in modern gels. UV lamps (the older style) emit a broader spectrum but cure slower and generate more heat. The critical spec is wattage—36 watts is the minimum for full coverage tips, while builder gels need 48+ watts to penetrate through opaque pigments. But here’s the beginner mistake: holding your hand too far from the LEDs. The effective curing zone is within 5mm of the lamp’s surface; every additional millimeter exponentially reduces curing power. Use the hand rests provided—they’re not suggestions, they’re engineering requirements.
The Flash Curing Technique for Beginners
Instead of curing each nail for the full 60 seconds, use a 5-second flash cure after each major application step. This sets the surface enough to prevent sliding while keeping the underlying gel pliable for adjustments. After your final layer, do your full cure. This technique, pioneered in 2025 and now standard in 2026 education, reduces curing shrinkage by 40% and prevents the “pull away from the edges” effect that causes lifting. Think of it as spot-welding before final construction.
Tip 7: Shape Before You File
Filing is not sculpting—it’s refinement. The majority of your shape should be created with gel placement, not abrasive removal.
The 180-Degree Rule for Extension Shaping
When viewing your nail from the side, the extension should create a smooth 180-degree curve from cuticle to tip. Any flat spots or angles in this curve create stress points. As you apply gel, constantly rotate your finger to view it from all angles, smoothing with your brush before curing. Beginners file excessively because they rely on abrasive correction instead of gel manipulation. Your goal is to file only 10-15% of the final shape. Use a coarse file (180 grit) only for initial length reduction, then immediately switch to 240+ grit for refinement.
Why Hand-Positioning Beats Power Tools
Electric files have a learning curve that can destroy a nail in seconds. For your first 20 sets, use only hand files. The tactile feedback teaches you how much pressure is needed and prevents the “dip and drag” damage common with e-files. When you do graduate to power tools, invest in one with adjustable torque settings below 15,000 RPM—anything faster is for experienced techs working on acrylic. The 2026 beginner-friendly e-files include vibration dampening that reduces hand fatigue and improves control; this feature is worth the premium.
Tip 8: Seal the Deal with Proper Finishing
The final 5% of your work determines 95% of the visual impact. A perfectly structured nail looks amateurish with poor finishing.
The Inhibition Layer Misconception
That sticky residue after curing isn’t uncured gel—it’s the oxygen inhibition layer, and removing it too early is a critical error. This layer actually protects the underlying gel from dust contamination during filing. Only remove it after you’ve completely finished shaping, using a cleanser specifically formulated for inhibition layer removal (not just alcohol). Alcohol can leave a filmy residue that dulls your top coat. In 2026, many top coats are designed to bond through the inhibition layer, eliminating this step entirely—look for “non-wipe” top coats to streamline your process.
Top Coat Application for Mirror Shine
Apply top coat in three strokes: one down the center, then one on each side without reloading your brush. This prevents pooling at the cuticle and ensures even distribution. The brush should barely kiss the gel—pressing creates brush strokes and traps bubbles. For glass-like shine, use a top coat with a refractive index above 1.5 (this spec is often listed on professional products). Cure for the full recommended time plus 30 seconds; under-cured top coat is the number one cause of premature dulling and surface scratches.
Tip 9: Develop a Maintenance Mindset
Extensions are a commitment, not a one-night stand. Your aftercare routine determines whether you’ll be a lifelong enthusiast or a frustrated quitter.
The Two-Week Touch-Up Protocol
At day 10-14, your natural nail has grown out approximately 2mm, shifting the balance point of your extension. This is when lifting begins. Instead of full removal, learn the “backfill” technique: gently file off the top coat near the cuticle, apply a thin bead of builder gel to the new growth area, and re-establish your apex connection. This 20-minute maintenance session extends your set to 4 weeks and reinforces the structure where it’s weakest. Beginners who master this technique reduce their product usage by 50% over three months.
Recognizing Early Signs of Lifting
Lifting doesn’t happen overnight—it telegraphs its intentions. A subtle color shift at the cuticle line (often a slightly yellow or white halo) indicates air is entering. A clicking sound when you tap the nail means partial separation has occurred. Address these immediately by applying a thin layer of penetrating resin (look for products labeled “bond sealer”) under the lifted edge and curing with a pinpoint LED pen light. Waiting until you see a gap means moisture has already compromised the bond, requiring full removal.
Tip 10: Learn Safe Removal Before You Even Start
The number one cause of natural nail damage isn’t poor application—it’s aggressive removal. Your removal technique should be planned before the first drop of gel touches your nail.
The 15-Minute Rule for Damage-Free Removal
Never attempt to remove extensions in under 15 minutes. The process should be 90% patience and 10% mechanical action. File off the top coat and color, then apply remover wraps saturated with pure acetone (not the drugstore 70% stuff). The 2026 standard is using heated removal mitts set to 110°F, which accelerates acetone penetration without the dehydration damage of direct heat. Check progress every 5 minutes by gently pressing on the extension—when it starts to flex, it’s ready to lift with a rosewood stick, not metal. Metal tools gouge the nail plate; wood provides just enough leverage without trauma.
Why Drilling Is Obsolete in 2026
The drill-heavy removal methods of 2023 are not just outdated—they’re nail health disasters. Modern soak-off systems have improved so dramatically that drilling should only be used by experienced techs for bulk reduction, never for full removal. If you’re tempted to drill because removal takes too long, you’re using the wrong products. Look for “rapid removal” builder gels that contain tertiary photoinitiators, breaking down 40% faster in acetone without sacrificing wear time. This is a formulation feature, not a marketing gimmick.
Troubleshooting Common Beginner Mistakes
Even with perfect technique, things go wrong. The difference between a frustrated beginner and a progressing artist is diagnostic skill.
When Extensions Pop Off: Root Cause Analysis
A clean pop-off (gel comes off as one piece) indicates a prep failure—likely moisture or oil residue. A shattered break (gel cracks and stays on the nail) signals improper apex placement or under-curing. If the natural nail comes with it, you’ve over-filed the nail plate during prep. Document each failure with photos; patterns emerge quickly that point to specific technique flaws. In 2026, smart lamps with curing sensors can detect under-cure in real-time—a feature worth considering if you’re struggling with mysterious failures.
Fixing Lateral Sidewall Lifting
Side lifting happens when gel retracts during curing, pulling away from the edges. The fix isn’t more gel—it’s better placement. Apply gel with a “floating” technique where you don’t touch the brush to the nail, instead letting the gel flow from a 2mm distance. This prevents displacement and maintains contact with the sidewalls. For existing side lifting, use a 0.5mm detailing brush to wick penetrating resin into the gap, then cure with a pinpoint light before it spreads.
Building Your Skill Progression Plan
Random practice creates random results. Structured skill building transforms effort into expertise.
The 30-Day Gel Extension Challenge
Week 1: Practice prep and application on practice tips only, no curing. Focus on brush control and apex visualization. Week 2: Apply and cure on your non-dominant hand only, keeping lengths short (5mm extension). Week 3: Move to your dominant hand, increasing length to 8mm. Week 4: Focus on shaping and finishing, aiming for a complete set in 90 minutes. This progression builds muscle memory without overwhelming you. Document each set with macro photos; improvement becomes undeniable.
Documenting Your Journey for Faster Learning
Create a “nail journal” tracking: room temperature, humidity, products used, cure times, and wear duration. Patterns emerge within three sets. You’ll discover your gel works perfectly at 70°F but fails at 65°F, or that your thumb requires 15% more cure time due to its curve. This data-driven approach cuts the learning curve in half. In 2026, some techs use smartphone microscopes ($30) to photograph the cuticle seal—seeing your work at 50x magnification is brutally honest and incredibly effective.
2026 Trends to Incorporate Into Your Practice
Staying current isn’t about chasing fads—it’s about leveraging innovations that make beginner success more achievable.
Sustainable Gel Formulations
Eco-conscious gels now perform as well as traditional formulas, using bio-based oligomers derived from castor oil. These products cure with less energy and remove faster, reducing acetone exposure by 30%. They’re slightly more expensive but worth it for the reduced environmental impact and gentler learning curve. When shopping, look for “90% bio-based content” certifications rather than vague “eco-friendly” claims.
Minimalist Extension Aesthetics
The 2026 aesthetic favors “structured gloss”—extensions with no color, just perfectly clear or milky pink gel that showcases architectural perfection. This trend actually benefits beginners because it eliminates the masking effect of opaque polish, forcing you to master structure. Plus, clear gel shows every bubble and imperfection, providing immediate visual feedback that accelerates learning. Embrace the clear gel challenge for your first five sets.
Creating Your Signature Length Transformation
Ultimately, these tips converge on one goal: developing a repeatable system that works for your unique nails.
Customizing Extension Maps for Your Natural Nail
Every nail bed has a “sweet spot” for extension length based on its width-to-length ratio. Measure your nail bed from cuticle to free edge. If it’s under 12mm, keep extensions under 10mm until you build strength. 12-15mm beds can support 12-15mm extensions. Longer beds can go dramatic. This 1:1 ratio prevents the lever effect that causes lifting. Create a template map of your ten nails with recommended lengths, and adjust based on wear patterns over three sets.
The Length-to-Strength Ratio Formula
For every 2mm of extension length, you need 0.1mm of gel thickness at the apex. A 10mm extension requires a 0.5mm apex. Most beginners apply gel too thin, creating flexible, weak nails, or too thick, creating heavy, lift-prone enhancements. Use a gel thickness gauge (a simple plastic card with notches) to measure while building. This objective measurement removes guesswork and builds consistent strength across all nails.
Frequently Asked Questions
How long does it realistically take for a beginner to complete a full set of gel extensions?
Your first set will take 3-4 hours as you develop muscle memory and battle nerves. By set five, expect 2 hours. By set ten, 90 minutes is achievable. The key is focusing on efficiency in prep and application, not rushing the curing or shaping stages. Time spent on proper prep saves 30 minutes in troubleshooting later.
Will gel extensions damage my natural nails if I’m just starting out?
Damage occurs from improper removal, not from wearing extensions. If you follow safe removal protocols (15+ minute soak, no prying), your natural nails will remain intact. However, beginners often over-file during prep, which thins the plate. Use a fine buffer with minimal pressure—three light passes is sufficient. Damage is a technique issue, not an inherent product problem.
What’s the minimum investment needed for quality beginner supplies?
Expect to spend $150-200 for professional-grade basics: a 48-watt LED lamp ($60), three essential gels (base, builder, top coat) at $20 each, a quality brush ($40), and prep products ($30). Avoid $50 “starter kits” that include low-wattage lamps and synthetic brushes—they’ll cost more in failed sets and frustration. This initial investment pays for itself after two home applications compared to salon prices.
Can I do gel extensions if I have short, brittle natural nails?
Absolutely—in fact, extensions can protect brittle nails while they grow. The key is starting with shorter extensions (5-7mm) and using a flexible builder gel with a Shore Hardness rating of D60-70 (softer than standard D80). This provides support without rigidity. Avoid full-coverage tips initially; they require more natural nail strength for adhesion. Builder gel applied directly creates a protective shell that encourages growth.
How do I know if my gel is curing properly?
After the full cure time, gently press your fingernail into the gel surface. Properly cured gel should feel hard with no give, and you shouldn’t see any fingerprint impression. If it feels tacky or soft, you have under-curing, which leads to allergies and lifting. If it’s brittle and cracks easily, it’s over-cured. Modern LED lamps with digital displays showing actual output wattage help diagnose this—if your lamp drops below 70% of its rated power, it’s time for a new bulb or unit.
What’s the biggest mistake you see beginners make in 2026?
Assuming more product equals more strength. Beginners glob on gel, creating heavy, unbalanced nails that lift within days. Modern gels are engineered for thin, structural application. A proper 10mm extension uses less product than you think—about the size of two sesame seeds per layer. Trust the chemistry; the gel wants to be thin. Over-application is the root cause of 80% of beginner lifting issues.
How often should I take breaks between sets?
If you’re using soak-off gels and proper removal, you don’t need breaks. The “nail break” myth comes from damage caused by improper removal and over-filing. Your natural nail plate is dead keratin; it doesn’t “breathe.” What it needs is consistent care, not vacation time. Focus on perfecting your removal technique rather than scheduling breaks. If you notice thinning, you’re over-filing, not over-wearing.
Can I use regular nail polish over gel extensions?
Yes, but you must seal it properly. Apply your gel top coat, cure, then wipe the inhibition layer. Apply regular polish, let it dry completely (at least 2 hours), then apply a water-based top coat specifically designed for hybrid wear. Oil-based top coats can cause gel to lift. For best results, use gel polish—it’s formulated to bond with the extension and removes cleanly with the rest of the set.
What humidity level should my workspace be for optimal results?
Aim for 40-50% relative humidity. Above 60%, gel absorbs moisture from the air during application, causing cloudiness and poor adhesion. Below 30%, static electricity attracts dust and the gel cures slightly faster, reducing work time. A small dehumidifier or humidifier in your workspace is a $30 game-changer. Monitor with a digital hygrometer; your naked eye can’t detect these fluctuations that silently sabotage your work.
How do I fix a lopsided apex after curing?
If you catch it immediately after curing, you can still correct it. File down the high side with a 240-grit file using light, sweeping strokes, then apply a thin bead of gel to the low side and flash cure. If the set is complete, you’ll need to file down the entire apex zone and rebuild. Don’t try to add more gel to one side without reducing the other—it creates an imbalance that throws off the entire nail architecture. Sometimes the best fix is strategic filing and a thin rebuild layer.