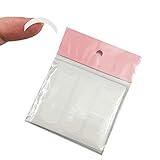
The timeless elegance of a French manicure never fades—but achieving that perfect, crisp smile line at home can feel like an art form reserved for salon professionals. Whether you’re a DIY enthusiast looking to master the classic white tip or a seasoned nail artist refining your technique, the right guidance system can transform your results from “almost there” to “flawlessly precise.” This year, French manicure tip guides have evolved beyond simple stickers, offering innovative materials and application methods that make the iconic look more accessible than ever.
Understanding how to select and use these tools effectively is the difference between a manicure that chips by day two and one that maintains its sophisticated edge for weeks. From adhesive stencils that hug every nail curve to reusable silicone systems that offer sustainability and precision, the landscape of French tip guides is rich with options. Let’s explore everything you need to know to evaluate, apply, and perfect your classic French manicure using the latest guiding techniques.
Top 10 French Manicure Tip Guides
Detailed Product Reviews
1. BlingKingdom 576pcs 12 Sheets French Nail Self-Adhesive Stickers Stencils Manicure Nail Tips Smile Line Guide for Women Girls - Moon Shape Design
Overview: The BlingKingdom French nail stickers offer an accessible entry point into professional-looking manicures with 576 pieces across 12 sheets. Designed specifically for creating classic French tips and smile lines, these vinyl stencils cater to both beginners experimenting at home and seasoned nail artists seeking reliable guides. The moon-shaped design provides the quintessential French manicure aesthetic that remains timeless in nail fashion.
What Makes It Stand Out: These stickers distinguish themselves through their soft yet durable vinyl construction that balances flexibility with strong self-adhesion. The application process is remarkably straightforward: position the curved stencil at the nail’s free edge, apply polish to the exposed area, and peel away after drying for crisp, salon-quality lines. This simplicity democratizes French manicure techniques that once required steady hands and extensive practice, making professional results achievable for anyone.
Value for Money: At $4.49 for 576 pieces, the cost per stencil is exceptionally low—less than a penny each. This represents outstanding value for budget-conscious consumers who want quantity without sacrificing basic functionality. While premium brands charge significantly more for fewer pieces, BlingKingdom delivers ample supply for numerous manicures, practice sessions, or sharing with friends. The price point makes experimentation virtually risk-free.
Strengths and Weaknesses:
- Strengths: Massive quantity at budget price; user-friendly application; suitable for all skill levels; versatile for various nail sizes
- Weaknesses: Limited design variety (only moon shape); vinyl thickness not specified; may lack the premium adhesion of higher-end brands; packaging description appears inconsistent
Bottom Line: The BlingKingdom stickers are an unbeatable value starter kit for French manicure enthusiasts. While they may not match premium brands in material sophistication, their affordability and ample supply make them ideal for beginners, practice, or casual users who prioritize quantity over specialized features.
2. Beetles French Manicure Nail Art Stickers 30 Sheets French Tip Tool 3 Designs Self-Adhesive Nail Tips Guides for DIY Decoration Nails Art
Overview: Beetles delivers a comprehensive French manicure system with 30 sheets featuring three distinct arc moon shapes and a bonus precision tweezers. This kit targets DIY enthusiasts and professional nail artists seeking versatility and precision in their stencil tools. The inclusion of multiple curve designs accommodates different nail shapes and personal preferences, making it a well-rounded solution for creating clean, classic French tips across various nail types.
What Makes It Stand Out: The standout feature is the meticulous attention to application quality—these stickers are engineered to prevent polish seepage, ensuring razor-sharp edges every time. The three design variations provide flexibility that single-shape kits lack, while the included tweezers demonstrate thoughtful consideration for precise placement. Their universal compatibility with regular polish, gel, and acrylics makes them truly versatile, and the clean removal without residue protects nail health—a critical consideration for frequent users.
Value for Money: Priced at $9.99 for 30 sheets plus tweezers, this kit positions itself in the mid-range category. While more expensive than budget options on a per-piece basis, the enhanced adhesion quality, design variety, and professional accessories justify the premium. The cost per use remains low given the multiple manicures each sheet provides, and the time saved from avoiding smudged lines adds intangible value for serious nail artists.
Strengths and Weaknesses:
- Strengths: Three design options; includes precision tweezers; superior adhesion without residue; works with all polish types; clean, professional results
- Weaknesses: Higher upfront cost; fewer total pieces than bulk alternatives; may be overkill for casual users
Bottom Line: Beetles offers a professional-grade kit that justifies its moderate price through quality materials, design versatility, and thoughtful accessories. Perfect for dedicated DIYers and nail artists who value precision and clean results over sheer quantity, making it a worthwhile investment for regular manicure sessions.
3. White Nail Sticker, 240 Pcs Manicure Nail Art Tips Form Guide Sticker Edge Tape DIY Stencil Tool Stickers and Decals

Overview: This minimalist white nail sticker set provides 240 pieces designed as form guide strips for creating precise nail art edges and patterns. Marketed as a reusable stencil solution, these stickers target cost-conscious users who want multiple manicures from a single purchase. The compact case organization appeals to those who value tidy workspaces and easy storage, while the variety of shapes promises creative flexibility beyond standard French tips.
What Makes It Stand Out: The reusability factor is the primary differentiator, offering an economical and eco-friendly alternative to single-use stencils. The organized compact case keeps the 240 pieces clean and accessible—a practical feature often overlooked in budget sets. The white color provides a neutral base that works with any polish shade, and the strip format allows for custom cutting to fit unique nail shapes, giving users more creative control than pre-shaped stickers.
Value for Money: At $5.20 for 240 reusable pieces, this set delivers exceptional long-term value. Assuming even minimal reuse potential, the effective cost per use drops dramatically compared to disposable alternatives. The compact case prevents loss and damage, preserving your investment. For regular manicure enthusiasts, this could represent months of supplies at a remarkably low price point, making it one of the most economical choices for sustained nail art practice.
Strengths and Weaknesses:
- Strengths: Reusable design maximizes value; organized storage case; versatile strip format; neutral white color; budget-friendly price
- Weaknesses: Material durability for reuse is unverified; adhesion may weaken after first use; limited information on polish compatibility; no specialized tools included
Bottom Line: An excellent choice for environmentally conscious users and frequent manicurists seeking maximum value. The reusability claim makes it uniquely economical, though longevity depends on careful handling. Ideal for those prioritizing budget and storage convenience over premium adhesion features.
4. Orly Half Moon Guides, 78 Count
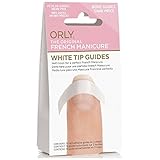
Overview: Orly, a trusted name in professional nail care, offers these Half Moon Guides as a premium solution for creating flawless French manicures. With 78 precision-cut stencils per package, this product targets serious nail artists who prioritize brand reputation and consistent quality over bulk quantity. The minimalist packaging reflects professional salon standards, focusing on performance rather than flashy marketing.
What Makes It Stand Out: The Orly brand carries significant weight in professional nail circles, ensuring these guides meet salon-quality standards that hobbyist brands may miss. The American-made product promises reliable adhesion and clean removal—critical factors for maintaining nail integrity during frequent manicures. The half-moon design is precisely engineered for optimal curve placement, reducing the learning curve for achieving that perfect French tip smile line that defines professional work.
Value for Money: At $7.18 for 78 pieces, Orly commands a premium price point that reflects its professional-grade positioning. While the cost per stencil is higher than budget alternatives, the investment pays dividends in consistent results and nail health protection. For nail technicians or serious enthusiasts who value reliability over quantity, the reduced frustration and professional finish justify the expense. This is a quality-over-quantity proposition that serves a specific market segment.
Strengths and Weaknesses:
- Strengths: Professional brand reputation; consistent quality; clean removal; American-made; trusted by salons; precise engineering
- Weaknesses: Limited quantity for the price; no design variety; lacks accessories; may be cost-prohibitive for casual users; minimal product information provided
Bottom Line: Orly delivers professional reliability that justifies its premium pricing for serious users. While not the most economical choice, it offers peace of mind through brand trust and consistent performance. Best suited for nail technicians and dedicated enthusiasts who prioritize quality and nail health over budget considerations.
5. TailaiMei 36 Sheets 1368 Pieces French Manicure Nail Art Stickers, 3 Designs Self-Adhesive Nail Tips Guides for DIY Decoration Stencil Tools (3 Moon Shape Design, 36 Sheets)

Overview: TailaiMei offers one of the most comprehensive French manicure kits available, with an impressive 1,368 pieces across 36 sheets featuring three distinct moon shape designs. This high-volume set targets both professional salons and avid DIYers who want extensive design options without frequent repurchasing. The sheer quantity ensures you’ll have guides for countless manicures, practice sessions, or client work, making it a true bulk solution.
What Makes It Stand Out: The extraordinary piece count combined with design variety creates unmatched versatility—over 400 stickers per design ensures you won’t run out of your preferred curve style. The high-quality vinyl construction is explicitly labeled nontoxic, addressing health concerns that some budget brands ignore. The product’s versatility extends to toenails and false nails, broadening its application beyond standard fingernail manicures. This comprehensive approach makes it a one-stop solution for diverse nail art needs.
Value for Money: At $8.99 for 1,368 pieces, the value proposition is staggering—costing mere fractions of a cent per stencil. Even with moderate usage, this supply could last years. The three design options add value typically found in more expensive kits, while the bulk pricing rivals or beats budget brands on a per-unit basis. For salons, the cost per client becomes negligible; for individuals, it eliminates frequent repurchasing, making it arguably the best overall value in this comparison.
Strengths and Weaknesses:
- Strengths: Massive quantity; three design options; nontoxic material; versatile application; exceptional price per piece; salon-grade potential
- Weaknesses: Storage may be cumbersome; quality consistency across such large quantity unverified; no precision tools included; may be excessive for casual users
Bottom Line: TailaiMei sets the standard for bulk value without sacrificing design variety. This kit is ideal for salons, nail art students, or committed DIYers who want maximum quantity and versatility at an unbeatable price. The sheer volume ensures you’ll never run out, making it a smart long-term investment for serious nail art practitioners.
6. French Manicure Strips,French Tip Nail Stickers for Nails Art Designs,Self Adhesive French Tip Stickers Guide for Women Manicure(3 Moon Shape Design,24 Sheets,912 Pieces)

Overview: This comprehensive French manicure kit delivers an impressive 912 self-adhesive stickers across 24 sheets, featuring three distinct moon-shaped arc designs. Each package includes a pair of tweezers for precise application, catering to both professional nail technicians and home enthusiasts. The vinyl construction ensures reliable adhesion without premature lifting, making it compatible with regular nail polish and acrylic systems alike.
What Makes It Stand Out: The sheer quantity sets this apart—912 pieces provide months of creative possibilities. Three differentiated arc shapes accommodate various nail sizes and curvature preferences, while the included tweezers solve the common frustration of handling tiny stickers. The vinyl material strikes an optimal balance between secure adhesion and clean removal without leaving residue or damaging base layers.
Value for Money: At $6.99 for 912 pieces, you’re paying less than $0.008 per sticker, representing exceptional value for frequent users. Comparable kits typically offer 200-400 pieces at similar price points. The inclusion of tweezers adds $2-3 value, eliminating separate purchases. For regular manicure enthusiasts, this single purchase could last a full year.
Strengths and Weaknesses: Strengths include massive quantity, three versatile shapes, professional-grade vinyl, and useful accessories. The stickers maintain position during polish application and release cleanly when dry. Weaknesses involve potential overwhelm for casual users—912 pieces may be excessive if you only manicure occasionally. Storage could become disorganized without careful sheet management. Some users with very curved nails might find the standard arcs require trimming.
Bottom Line: Ideal for dedicated nail art enthusiasts and professionals seeking variety and volume. Casual users may prefer smaller quantities, but the per-unit value and versatility make this a smart long-term investment for anyone committed to regular French manicures.
7. Moon Shape French Manicure Stickers - 24 Sheets Self-Adhesive Nail Art Stencils & Smile Line Guides for Women and Girls (Over 1000 Pieces)

Overview: This budget-friendly kit provides over 1000 moon-shaped French manicure stickers across 24 reusable sheets, specializing in creating perfect smile lines. The flexible vinyl decals adhere securely to nails while guiding precise polish application, then remove cleanly without residue. Designed for both salon professionals and DIY beginners, the kit focuses on delivering quantity and simplicity in one economical package.
What Makes It Stand Out: The “over 1000 pieces” claim delivers exceptional volume at the lowest price point in this category. Reusable sheets add sustainability value—gently cleaned stickers can serve multiple applications. The curved moon design specifically targets the classic French smile line, the most challenging aspect of freehand manicures. Soft vinyl construction conforms to nail curvature without wrinkling.
Value for Money: At $4.19, this represents the best per-piece value among comparable products—approximately $0.17 per sheet or fractions of a cent per individual sticker. Most competitors charge $5-8 for half the quantity. The reusable nature extends value further, effectively doubling or tripling the sticker count. For beginners experimenting with French tips, the low financial risk encourages practice.
Strengths and Weaknesses: Strengths include unbeatable price, generous quantity, clean removal, and beginner-friendly simplicity. The vinyl material prevents polish bleed-through when properly sealed. Weaknesses center on limited design variety—only moon shapes are included, restricting creative options beyond classic French tips. Reusability claims may be optimistic; adhesive typically degrades after 1-2 uses. Very small nail beds might find the pre-sized curves slightly large.
Bottom Line: The ultimate budget choice for French manicure purists. If you exclusively want classic smile lines and prioritize quantity over variety, this kit delivers unmatched value. Those seeking diverse shapes should look elsewhere.
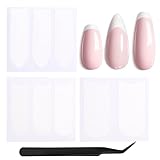
8. Modelones French Tip Tool- 6 Pcs Nail Stamp French Manicure Kit Suitable for DIY Together with Gel Nail Polish Art Tips Printing Tool Kit

Overview: Modelones shifts from stickers to stamping technology with this six-piece kit designed specifically for gel polish applications. The set includes one jelly stamper, one scraper, and four replacement heads in two diameters (1.1 and 0.8 inches). Crystal silica gel construction ensures crisp pattern transfer and durability. This system targets users seeking reusable tools rather than disposable stickers, particularly gel polish enthusiasts.
What Makes It Stand Out: Dual-size stampers accommodate everything from petite pinkies to dramatic stiletto nails within one kit. Four replacement heads provide exceptional longevity—when one loses stickiness, simply swap it out. The crystal silica gel material maintains consistent transfer quality across hundreds of uses, unlike cheaper silicone alternatives that degrade. Clear stamper bodies allow precise placement visualization.
Value for Money: At $7.99, the kit costs more upfront than sticker alternatives but eliminates repeat purchases. Four replacement heads effectively provide five tools in one package. Comparable stamping kits with fewer heads retail for $10-15. For gel polish users specifically, the tool’s compatibility prevents costly product waste from sticker adhesion failures.
Strengths and Weaknesses: Strengths include reusable design, multiple head sizes, excellent gel polish compatibility, and easy cleaning with cleanser. The scraper ensures thin, even polish layers for perfect transfers. Weaknesses involve a learning curve—stamping requires practice to master pressure and technique. The kit lacks design plates, requiring separate purchases for patterned art. Users preferring traditional polish may find stickers more convenient than stamping setup.
Bottom Line: Perfect for gel polish devotees ready to invest in reusable tools. The replacement heads and dual sizes justify the moderate price premium. Beginners should expect a practice period, but long-term savings and creative flexibility reward the effort.
9. Fcozpjk French Tip Nail Stickers 6 Sheets Self-Adhesive Nails Sticker French Tips Guides Tool Wave Lines Nails Tape for Nail Art Airbrush Stencils Set

Overview: This specialized six-sheet kit focuses on gel manicure precision with approximately 250 black French tip stickers in varied designs including V-shape, wave, deep French, and half-moon patterns. The black color serves a functional purpose—preventing UV lamp curing underneath covered areas. Tailored for both salon professionals and home learners, the set emphasizes clean line creation for advanced gel techniques.
What Makes It Stand Out: The black sticker innovation directly addresses gel manicure challenges, allowing for layered curing techniques impossible with standard white guides. Design variety moves beyond classic arcs to include waves and deep French options, enabling modern interpretations. The product description explicitly targets airbrush applications, suggesting professional-grade precision for fine-detail work.
Value for Money: Priced at $3.99 for ~250 pieces, the per-unit cost aligns with budget options while offering specialized functionality. Standard white guides at this price rarely provide design variety or gel-specific features. For gel users, the ability to prevent unintended curing saves product waste and redo time, translating to indirect savings.
Strengths and Weaknesses: Strengths include black UV-blocking design, shape variety, low price, and gel-specific optimization. The application process is straightforward with clear step-by-step instructions. Weaknesses involve lower quantity than bulk kits—250 pieces suit moderate use but deplete quickly for professionals. Adhesive strength may vary; gel polish’s tackiness can dislodge stickers if not pressed firmly. Limited to gel applications; regular polish users gain no advantage from black color.
Bottom Line: Essential for gel polish technicians exploring advanced French techniques. The UV-blocking feature and design variety justify purchase despite modest quantity. Traditional polish users should choose standard white stickers instead.
10. Saviland French Tip Nail Stamp: 4PCS Nail Art Stamper Kit Clear Silicone Nails Stamping Long & Short Jelly Stamper with Scrapers Nails Stamper Kit for French Manicure Home DIY Salon

Overview: Saviland’s four-piece stamping kit emphasizes versatility with two distinct stamper sizes—long and short—plus dual scrapers. The clear silicone jelly heads provide visibility during placement, while removable designs facilitate thorough cleaning. Crafted from upgraded softer silicone, the kit targets users prioritizing precision and maintenance ease for both home and salon environments.
What Makes It Stand Out: The long and short stamper combination addresses ergonomic preferences and nail size extremes in one package. Clear construction eliminates guesswork when aligning tips on the nail bed. Removable heads allow deep cleaning without damaging the stamper body—a common issue with integrated designs. The brand explicitly warns about gentle pressure for pointed nails, demonstrating material transparency.
Value for Money: At $7.99 for four pieces, the kit sits in the mid-range price bracket. Two stampers plus two scrapers provide complete stamping capability without requiring separate tool purchases. The removable heads effectively double tool lifespan, as replacements cost $3-5 individually. For users wanting both size options without buying two full kits, this represents consolidated value.
Strengths and Weaknesses: Strengths include clear visibility, dual sizes, removable/cleanable heads, and included scrapers. The softer silicone conforms well to nail curves for full-contact transfers. Weaknesses center on material softness—improper pressure can crack heads, particularly on square nails. The kit lacks replacement heads, requiring full repurchase after wear. No design plates are included, limiting initial creative options to French tips.
Bottom Line: Excellent for precision-focused users who value visibility and size options. The clear design and removable heads justify the price, but handle the softer silicone with care. Pair with stamping plates for full creative potential.
Understanding French Manicure Tip Guides
What Are French Manicure Guides?
French manicure guides are precision tools designed to create the signature white tip of a classic French manicure by masking off the nail bed while you paint the free edge. These tools come in various formats—including adhesive strips, stencil sheets, and reusable silicone molds—each engineered to help you achieve that coveted clean, curved smile line without freehand guesswork. Unlike general nail art stickers, these guides are specifically contoured to follow the natural anatomy of the nail, ensuring anatomically correct placement that flatters every finger shape.
Why Use Guides for Classic French Tips?
Even professional nail technicians rely on guides when speed and consistency are paramount. For at-home users, these tools eliminate the frustration of uneven tips, wobbly lines, and time-consuming touch-ups. They serve as training wheels for developing muscle memory, allowing you to focus on polish application rather than artistic anxiety. More importantly, modern guides account for nail width variance, growth patterns, and curvature—factors that make freehand French tips challenging for non-experts. The result is a salon-quality finish that maintains the understated sophistication that makes the French manicure a perennial favorite.
Types of French Manicure Guides
Adhesive Tip Guides
Adhesive guides feature a thin, flexible material with a gentle sticky backing that adheres directly to the nail. These single-use tools typically come in pre-cut curved shapes that you press onto the nail bed, leaving only the tip exposed for painting. The best versions use medical-grade adhesive that won’t damage the base coat or leave residue. When evaluating adhesive guides, look for perforated edges that tear away cleanly and materials thin enough to prevent polish from pooling along the guide’s edge, which can create a ridge in your final look.
Stencil-Style Guides
Stencil guides function as overlays rather than adhesives—these are rigid or semi-rigid sheets with cut-out openings that you hold firmly against the nail while polishing. Made from materials like Mylar or flexible plastic, they require a steady hand but offer reusability and zero adhesive interaction with your base layers. The key advantage lies in their durability; a quality stencil guide can last hundreds of applications if properly cleaned. However, they demand more dexterity and work best when you have a stable hand-rest or manicure station setup.
Reusable Silicone Guides
Silicone guides represent the premium tier of French manicure tools, featuring soft, flexible molds that wrap around the fingertip. These guides create a physical barrier that conforms to nail curvature, preventing any polish from bleeding onto the nail bed. Their washable, autoclavable nature makes them ideal for both personal and professional use. The material’s natural grip means no adhesive is necessary, though they require proper sizing—most quality sets include multiple sizes to accommodate different finger dimensions. The initial investment is higher, but the precision and sustainability justify the cost for frequent users.
Digital/Virtual Guide Systems
Emerging technology has introduced digital guide systems that project guidelines onto nails or use augmented reality apps to visualize placement before application. While these don’t physically mask the nail, they serve as sophisticated positioning aids that help you develop freehand skills with visual confidence. These systems often include calibration features that account for nail shape irregularities and can store custom curve preferences for consistent results across multiple manicure sessions.
Key Features to Evaluate
Material Flexibility and Durability
The ideal guide material balances flexibility with structural integrity. Overly rigid guides won’t conform to nail curvature, creating gaps where polish can seep underneath. Conversely, excessively flimsy materials tear during removal or shift during application. Look for materials that specify “tear-resistant” and “conformable” properties. For reusable options, durability testing should include resistance to acetone and repeated flexing without cracking. The thickness matters too—aim for 0.1mm to 0.3mm for optimal performance.
Curve Precision and Tip Shapes
French manicure guides should offer multiple curve radii to match different nail shapes: almond, square, oval, and stiletto. The “smile line”—the curved boundary between tip and nail bed—should appear natural, not artificial or overly dramatic. Evaluate whether guides provide subtle variations in depth (how far the tip extends toward the cuticle) and width. Some advanced systems include adjustable sliders that let you customize the curve, while others offer themed packs for “conservative,” “moderate,” and “dramatic” tip lengths.
Adhesive Strength and Residue
For adhesive guides, the stickiness level is critical. Too weak, and polish bleeds underneath; too strong, and you risk pulling off your base coat during removal. Premium guides use pressure-sensitive adhesives that activate with firm pressing but release with gentle, perpendicular pulling. Test for residue by applying the guide to a swatch of dried base coat—if it leaves a tacky film, it may interfere with topcoat adhesion. Water-soluble adhesives offer easier cleanup but compromise on hold strength.
Compatibility with Polish Types
Not all guides work equally well with gel, traditional lacquer, and dip powder systems. Gel polish’s thicker viscosity requires guides with stronger adhesion to prevent creeping, while dip powders need guides that can withstand tapping and brushing motions without shifting. Check material specifications for chemical resistance—some adhesives break down when exposed to gel cleansers or dip powder activators. The best universal guides maintain their integrity across all three systems without degrading.
Application Techniques
Nail Preparation Essentials
Proper prep determines 90% of your success. Begin with completely dry, oil-free nails—any residue prevents guides from sealing properly. Apply a thin base coat and cure or dry it completely; a tacky surface causes guide adhesion to the polish rather than the nail plate. Lightly buff the nail’s surface with a fine-grit buffer (180-grit or higher) to create microscopic texture that improves guide grip without thinning the nail. Finally, wipe with alcohol or nail dehydrator immediately before guide application to remove any lingering oils.
Placement Strategies for Symmetry
Achieving identical tip placement across all ten nails requires a systematic approach. Start with your dominant hand’s index finger as a reference point—it’s typically the most visible and sets the visual standard. Use a cuticle pusher or orange stick to gently press the guide’s curve, working from center outward to eliminate air bubbles. For symmetry, measure the distance from cuticle to guide edge using a small ruler or the guide’s own markings; many professionals work under magnification to ensure consistency. Always apply guides to all nails before painting any tips to allow for repositioning.
Polish Application Methods
The technique changes based on your polish type. For traditional lacquer, use thin, feathered strokes starting at the guide’s edge and pulling toward the tip—this prevents pressure buildup that forces polish underneath. With gel polish, apply a structured bead at the free edge and let it self-level toward the guide, using a detail brush to perfect the curve. Dip powder requires a different strategy: apply the base liquid only to the exposed tip area, then dip at a 45-degree angle to avoid disturbing the guide. Regardless of method, cap the free edge by wrapping polish over the nail tip.
Guide Removal Timing
Timing is everything. Remove adhesive guides while the polish is still tacky—not fully wet, but not completely dry. For lacquer, wait 60-90 seconds after application; for gel, flash cure for 10-15 seconds before removal. Pull the guide away slowly at a 45-degree angle toward the nail center, never straight up. This technique creates a crisp line by allowing the partially set polish to settle slightly over the guide’s edge, forming a seamless transition. Removing guides too late risks pulling dried polish and creating jagged edges.
Troubleshooting Common Issues
Preventing Bleed-Through and Seepage
Bleed-through occurs when polish seeps under the guide, creating a fuzzy smile line. Combat this by applying a “seal” layer: after placing guides, paint a thin layer of base coat along the guide’s edge and let it dry completely. This creates an additional barrier. Also, avoid overloading your brush—excess polish pools at the guide edge and finds microscopic gaps. For persistent issues, try a “reverse application”: paint the tip first, apply the guide over the wet polish, then fill in the nail bed color. Once dry, remove the guide to reveal a perfect line.
Fixing Uneven Smile Lines
If your smile lines appear asymmetrical after guide removal, don’t panic. Dip a fine detail brush in acetone and carefully trace along the imperfect edge to refine the curve. For minor corrections, use a concealer brush with a small amount of white polish to build up shallow areas. To prevent future issues, photograph your guide placement from a consistent angle before painting—this creates a reference for identifying placement errors. Some professionals lightly mark the desired smile line apex on each nail with a water-soluble pen before applying guides.
Addressing Guide Adhesion Problems
Guides that lift during application ruin the entire process. If adhesion fails, the culprit is usually oil or moisture. Beyond standard prep, try a nail primer specifically designed for sensitive adhesion. For silicone guides that won’t stay put, a tiny amount of water on the fingertip can create suction, though this risks moisture seepage. In humid environments, work in an air-conditioned space or use a small fan to keep nails dry. For adhesive guides that lose stick after repositioning, keep a spare set handy—most adhesives are single-use in practice, even if marketed as repositionable.
Advanced Tips for Professional Results
Creating Custom Guide Shapes
Don’t limit yourself to manufacturer curves. You can trim adhesive guides with small, sharp scissors to create custom shapes—shallower curves for short nails, deeper arcs for dramatic looks. For stencil guides, use a craft knife to modify openings, but smooth all cut edges with fine sandpaper to prevent polish snagging. Some artists layer multiple guides: place a standard guide, then overlay a second guide rotated slightly to create unique French tip variations like double-French or chevron tips. Always test custom shapes on a practice nail first.
Combining Guides with Freehand Techniques
The most sophisticated looks blend guided precision with artistic flair. Use guides to establish the base smile line, then remove them and freehand subtle enhancements—maybe a whisper-thin metallic line just above the white tip or a soft ombré fade created by dry-brushing. This hybrid approach builds confidence while developing freehand skills. Another technique: apply guides only to your problem nails (typically the dominant hand) while freehanding your steady hand, ensuring overall consistency while practicing technique.
Maintenance and Care
Cleaning and Storing Reusable Guides
Reusable guides demand proper maintenance to retain precision. After each use, immediately clean them with a non-acetone polish remover to prevent polish buildup. For silicone guides, soak in warm, soapy water, then use a soft toothbrush to remove residue from crevices. Pat dry with lint-free cloths—never paper towels, which leave fibers. Store flat in protective sleeves away from direct sunlight, which can degrade both adhesive and flexible materials. Periodically inspect for micro-tears or stretched areas that compromise performance; even quality guides have finite lifespans.
Design Variations
Adapting Guides for Modern French Looks
Classic French tips are just the beginning. Guides can create micro-French details (thin 1-2mm tips), reverse French manicures (painting the cuticle area instead of the tip), and diagonal French variations. Use standard guides at an angle for asymmetrical looks, or cut them into halves to create half-moon manicures. For the trending “French fade” or baby boomer look, apply guides as usual, then use a sponge to create a gradient before guide removal. The key is viewing guides not as limitations but as foundations for creative interpretation.
Frequently Asked Questions
How do I choose the right guide size for my nail shape?
Measure your nail width at the widest point and compare it to guide sizing charts. Most quality systems offer 6-8 sizes per pack. For oval nails, size down; for wide square nails, size up. The guide should cover 2-3mm of nail bed skin on each side without touching the cuticle.
Can I reuse adhesive guides if I’m careful?
Technically yes, but performance degrades significantly after the first use. Adhesive strength drops by 60-70% upon removal, increasing bleed-through risk. For practice sessions, reuse is fine, but for final manicures, always use fresh guides. Some brands sell “repositionable” versions with stronger adhesives, but these cost more.
Why does my white tip look chunky or uneven after using a guide?
This typically results from applying polish too thickly or removing the guide too late. Polish shrinks as it dries; if the guide stays on until fully dry, the polish pulls away from the edge. Apply two thin coats instead of one thick coat, and remove guides while the second coat is still slightly tacky.
How do I prevent guides from damaging my base coat?
Ensure your base coat is completely dry—wait a full hour if using lacquer, or cure properly if using gel. Apply a thin layer of fast-dry topcoat over the base before guide application; this creates a protective barrier. When removing guides, pull parallel to the nail rather than upward, and support the nail plate with your other finger.
Are there guides specifically for gel polish versus regular polish?
Yes, though many work for both. Gel-specific guides use stronger adhesives to withstand the heavier viscosity and curing process. They’re often made from materials that resist heat from LED lamps. Regular polish guides prioritize clean removal on dried lacquer. Universal guides typically specify “gel-compatible” on packaging.
What’s the best way to store adhesive guide strips long-term?
Keep them in their original packaging, sealed in a zip-top bag with a silica gel packet to control humidity. Store flat in a cool, dark drawer. Heat and light degrade adhesive over time. Properly stored, quality guides remain effective for 12-18 months. Never refrigerate—the moisture condensation ruins adhesion.
Can guides help with extremely short or bitten nails?
Absolutely. For short nails, use guides with shallower curves or trim standard guides to reduce tip depth. Some brands offer “petite” lines specifically for nails under 12mm in length. The key is placing the guide closer to the tip—sometimes only 1-2mm of white—to create the illusion of length without overwhelming the small nail plate.
How do I clean up polish that seeps under the guide?
Wait for the polish to dry completely, then use a fine-tipped brush dipped in acetone to carefully trace along the smile line. For gel polish, you must do this before the final cure—use a wooden stick to gently scrape away wet gel from the nail bed. Prevention is easier than correction, so focus on proper guide adhesion first.
Do professional nail techs really use guides, or is it just marketing?
Reputable techs absolutely use guides, especially for full sets requiring consistency across ten nails. Many use them as time-saving tools during busy periods or for clients with difficult nail shapes. However, experienced artists often use them as a starting point, then refine freehand. It’s a tool, not a crutch—like a baker using measuring cups while still understanding the recipe.
Why are my French tips different widths even when using the same guide?
This usually stems from inconsistent nail lengths or guide placement. If some nails are shorter, the same guide size will expose more tip area. Always file nails to uniform lengths before starting. Also, check that you’re aligning each guide’s center mark with your nail’s center axis—off-center placement creates uneven tip exposure even with identical guide sizes.