If you’ve ever dreamed of salon-quality nails that bend with your natural nail instead of cracking at the first sign of stress, rubber base gels with self-leveling formulas might just be your new obsession. These innovative products have revolutionized the at-home and professional manicure world, offering unprecedented flexibility and durability that traditional base coats simply can’t match. Unlike rigid gel systems that can feel brittle and unforgiving, modern rubber base gels create a flexible foundation that moves with your nails through daily activities—typing, texting, and even the occasional accidental tap against a hard surface.
But here’s the thing: not all rubber base gels are created equal. The market is flooded with options promising miraculous results, yet the difference between a formula that delivers two weeks of flawless wear and one that peels within days often comes down to subtle technical details most consumers never learn about. Whether you’re a DIY enthusiast ready to upgrade your home manicure game or a professional technician looking to refine your product knowledge, understanding what makes these self-leveling wonders tick will transform your approach to nail enhancement.
Top 10 Rubber Base Gels
Detailed Product Reviews
1. Beetles Rubber Base Gel Nail Polish, 6 Colors Nude Gel Polish Pink Peach Neutral Sheer French Tips Base Colors for Nails Flexible U V LED Soak Off for DIY Home Manicure Nail Gifts

Overview: This Beetles six-color collection delivers a versatile 5-in-1 solution combining base coat, color gel, and nail strengthener functions in each bottle. The nude palette spans pink, peach, and neutral sheer tones ideal for French tips and everyday wear. Designed for home manicurists, this set eliminates the need for separate base products while promising salon-grade durability through LED curing.
What Makes It Stand Out: The infusion of hydrolyzed wheat protein and calcium pantothenate distinguishes this formula, actively repairing damaged nails while providing cosmetic enhancement. Its hema-free, toxin-free natural resin composition appeals to health-conscious users seeking safer alternatives. The flexible, non-brittle texture prevents chipping by moving with the natural nail, while the 5-in-1 design significantly reduces both application time and product costs for beginners building their nail art collection.
Value for Money: At $12.34 for six 7.5ml bottles, this set costs roughly $2.06 per shade—a fraction of salon service prices. The multi-functional nature eliminates separate base coat and strengthener purchases, potentially saving $15-20. For DIY enthusiasts, the durability claims of three weeks plus extend the value proposition beyond typical drugstore polishes.
Strengths and Weaknesses: Strengths include nutrient-enriched formula, impressive longevity, beginner-friendly application, and genuine cost consolidation. The comprehensive allergy warning and “professional use only” disclaimer raise safety concerns for novices. Color accuracy issues may occur due to monitor variations, and the mandatory LED lamp requirement adds hidden costs.
Bottom Line: Ideal for budget-conscious beginners wanting professional results without multiple product investments. While the allergy warning demands careful patch testing, the nutritional benefits and 5-in-1 convenience make this a smart starter kit for committed DIY manicurists prioritizing both aesthetics and nail health.
2. GAOY 6 Colors Rubber Base Gel Set, Jelly Builder Base Nail Gel Nude Sheer White Pink, 2-in-1 Soak Off Nail Strengthener, Blush Jelly

Overview: GAOY’s six-color jelly builder base set targets thin, weak nails with its unique 2-in-1 formulation that merges base coat and color gel. The translucent nude, sheer white, and pink shades create a soft, blush-like effect while reinforcing nail structure. Each 7.3ml bottle promises to simplify manicure routines by combining essential steps into one product.
What Makes It Stand Out: The jelly texture provides a pliable, cushioning layer that strengthens without rigidity—a savior for naturally thin nails prone to bending and breakage. The brand’s explicit instruction to wipe away excess gel after curing demonstrates attention to adhesion science, ensuring better top coat bonding. This technical detail shows GAOY’s focus on longevity over mere convenience, addressing a common DIY failure point.
Value for Money: Priced at $12.99 for six bottles, this set offers competitive value at approximately $2.17 per shade. The builder gel properties eliminate separate strengthening treatments costing $8-12 individually. For users with chronically weak nails, the preventative benefits against splitting and lifting justify the investment compared to frequent salon repairs.
Strengths and Weaknesses: Major strengths include the specialized jelly consistency, explicit curing guidance, and targeted nail reinforcement. The requirement to wipe excess adds an extra step some may find tedious. Sheer shades may lack opacity for those preferring full coverage, and the limited color range focuses solely on neutral blush tones.
Bottom Line: Perfect for individuals with fragile nails seeking both cosmetic enhancement and structural support. The jelly formula’s unique flexibility makes it superior to standard rubber bases for problematic nails, though the wiping step requires patience. A worthwhile investment if nail health is your primary concern.
3. modelones Builder Rubber Gel Base Coat for Nails, Clear Rubber Base Gel Nail Polish for Strengthen/Apex Building/Enhance/Reinforced Long Lasting Fiber Protect Soak Off U V LED Gift for Thin Weak Nails

Overview: Modelones delivers a specialized clear rubber base gel engineered explicitly for damaged, thin, and brittle nails. This treatment-first product prioritizes nail rehabilitation over color variety, offering a single transparent formula designed to create apex curvature and provide fiber-like reinforcement. The 11 toxin-free composition targets users seeking restorative nail care.
What Makes It Stand Out: Exceptional adhesion without requiring nail plate buffing sets this apart—preserving natural nail integrity while preventing lifting. The nano-plant resin formula demonstrates advanced chemistry, bending seamlessly with the nail to reduce breakage risk. Its apex-building capability allows DIY sculpting of natural-looking curvature, making it dual-purpose as both treatment and subtle enhancement.
Value for Money: The $6.99 price appears economical until noting the $21.18 per fluid ounce rate, reflecting its concentrated premium ingredients. For those with severe nail damage, this targeted treatment justifies the cost compared to salon strengthening services ($30-50 per visit). The multi-use capability as base coat, builder, and clear polish consolidates three products into one.
Strengths and Weaknesses: Outstanding strengths include no-buff adhesion, restorative formula, and professional-grade flexibility. The single clear shade limits aesthetic versatility, making it unsuitable as a standalone color collection. Small volume may deplete quickly with regular use, and the premium per-ounce price demands commitment to nail health goals.
Bottom Line: The ultimate choice for nail rehabilitation over decoration. If your nails are splitting, peeling, or post-acrylic disasters, this clear builder gel’s restorative properties outweigh its lack of color options. Treat it as a medical-grade foundation rather than a fashion statement.
4. Beetles Rubber Base Builder Nail Gel Set - 6 Colors Nude Pink White Base Gel Polish 5 in 1 for Nail Extension, Repair and Sculpting, Soak Off U V LED Lamp Cure Manicure Art Design Gifts for Women
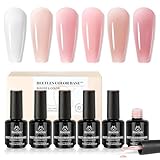
Overview: Beetles’ second 5-in-1 entry focuses on sculptural nail artistry with six sheer nude and pink shades optimized for extensions, overlays, and French tips. This set merges builder gel, base coat, and color into one self-leveling formula designed for both structural repair and aesthetic enhancement. The cruelty-free, low-odor composition targets ethically-minded DIYers.
What Makes It Stand Out: The self-leveling technology minimizes filing labor—a common beginner frustration—while enabling true nail extension and sculpting capabilities beyond simple overlays. Unlike basic rubber bases, this formula supports architectural nail building. The cruelty-free certification and upgraded low-odor formula address environmental and sensory concerns, making extended sessions more pleasant.
Value for Money: At $12.59 for six 7.5ml bottles, the pricing mirrors Product 1 while adding sculpting functionality. The ability to create extensions without separate builder gel (typically $15-25) represents significant savings. For users progressing beyond basic manicures, this eliminates professional service costs ($40-60 per sculpting session).
Strengths and Weaknesses: Strengths include true building capacity, beginner-friendly self-leveling, ethical formulation, and comprehensive 5-in-1 utility. Weaknesses overlap with Product 1: potential color variation from digital swatches and mandatory LED investment. The sculpting feature may intimidate absolute beginners despite marketing claims.
Bottom Line: The superior Beetles option for growth-oriented nail artists. If you plan to evolve from painting to building, this set’s sculpting capabilities justify the near-identical price to Product 1. For strictly color application, choose Product 1; for structural creativity, this builder variant wins.
5. CANNI Rubber Base Gel Nail Polish Set- 6 Pcs 9 Ml Transparent Pink Rubber Base for Nails, Soak Off LED Nail Gel Manicure Kit DIY at Home Salon Gifts

Overview: CANNI positions itself as the premium professional alternative with six transparent pink rubber base gels in larger 9ml color-coded bottles. This set emphasizes high-pigment formulation and extended 30-day wear claims, targeting serious DIY manicurists seeking salon-grade longevity. The transparent pink spectrum suits French manicures and subtle blush effects.
What Makes It Stand Out: Color-coded bottles solve a practical pain point—no more guessing shades through opaque packaging. The high-pigment formula ensures even sheer tones achieve full coverage in fewer coats, saving time and product. The ambitious 30-day wear claim exceeds typical 2-3 week promises, suggesting superior adhesion chemistry for demanding users.
Value for Money: At $19.99, this is the priciest option, but the 9ml bottles offer 20% more product than competitors. The $10.41 per fluid ounce rate actually undercuts Modelones, delivering premium features at mid-tier pricing. For users prioritizing longevity and professional presentation, the color bottles alone justify the premium over $12-13 sets.
Strengths and Weaknesses: Major strengths include innovative color packaging, pigment density, longest wear claim, and generous volume. Weaknesses center on the limited pink color palette and highest absolute price. The 30-day claim requires perfect application to achieve, potentially disappointing novices. Requires both base and top coat, reducing its “all-in-one” appeal.
Bottom Line: The professional’s DIY choice. If you value packaging innovation, maximum pigment payoff, and extended wear over color variety, CANNI justifies its premium. For casual users, the price premium is unnecessary; for perfectionists seeking salon-quality tools, the color bottles and 30-day promise deliver tangible advantages.
6. modelones Builder Rubber Base Gel for Nails, Light Milky Baby Pink 6 in One Nude Color Base Coat Strengthen Apex Building Extension Long Last Protect Soak Off Manicure for Fragile Nail Art DIY Home
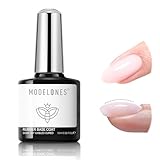
Overview: Modelones delivers a versatile 6-in-1 rubber base gel in a delicate light milky baby pink shade. This professional-grade formula specifically targets fragile, thin nails that need reinforcement without sacrificing flexibility. Designed as an all-in-one solution, it functions as a base coat, builder gel, nail strengthener, repair treatment, thickening agent, and sheer color polish.
What Makes It Stand Out: The standout feature is its nano-plant resin formulation that’s 11 toxin-free and low-odor, making it exceptionally gentle for sensitive nails. Unlike rigid builder gels, this rubber base bends with your natural nail, dramatically reducing breakage risk. Its self-leveling properties create a smooth apex and natural curvature without professional skill. The 30-60 second cure time under UV/LED lamps speeds up your DIY manicure significantly.
Value for Money: At $6.99, this multi-functional gel eliminates the need for separate base coats, strengtheners, and builder products. The formulation underwent 103 stability tests, offering salon-quality results at drugstore prices. For those with brittle nails, it replaces several specialized treatments in one bottle.
Strengths and Weaknesses: Strengths include exceptional flexibility, clean ingredient list, impressive adhesion without heavy nail prep, and genuine strengthening benefits. Weaknesses: the pale pink shade may require multiple coats for opacity and won’t suit those preferring clear or bolder colors. Beginners might need practice to achieve ideal thickness.
Bottom Line: Modelones is ideal for DIY enthusiasts with weak nails seeking a natural, protective manicure. Its clean formula and 6-in-1 versatility make it a smart investment for long-term nail health.
7. RARJSM Rubber Base Coat Gel Polish Nude Dirty Pink Skin Tone Rubber Base Gel for Nails Natural Nude Color French Manicure Extend Gel Soak Off Curing Requires Single Bottle 15ml Salon Home DIY Use

Overview: RARJSM’s Rubber Base Coat Gel in nude dirty pink offers professional-grade nail enhancement in a generous 15ml bottle. This thick, self-leveling formula serves as a base coat, quick extension gel, sheer color, and nail strengthener all in one, making it perfect for weak, brittle nails that need extra protection and length.
What Makes It Stand Out: The 15ml capacity provides nearly double the volume of standard gels, offering exceptional longevity. Its unique thick consistency allows for 1-2cm nail extensions without running into cuticles—a game-changer for DIY nail artists. The intentionally tacky finish after curing creates superior adhesion for subsequent layers, ensuring your manicure stays pristine for 21+ days.
Value for Money: At $6.99 for 15ml, this product delivers outstanding value. Most competitors offer 8-10ml at similar prices. The multi-functionality eliminates separate purchases of extension gels and base coats, making it economical for regular users.
Strengths and Weaknesses: Strengths include large volume, excellent self-leveling properties, strong adhesion, and impressive wear time. The nude dirty pink creates a sophisticated French manicure base. Weaknesses: the “dirty pink” shade may not appeal to everyone, and the sticky post-cure layer could confuse beginners. The specific shade might not complement all skin tones.
Bottom Line: RARJSM excels for those wanting nude-toned extensions and maximum product volume. It’s a cost-effective, professional-quality solution for home manicurists focused on longevity and nail health.
8. Nicedeco Hema Free Clear Rubber Base Gel Polish for Nails U V Cruelty Free Vegan Color Base Gel Nail Polish 15ML

Overview: Nicedeco’s Clear Rubber Base Gel prioritizes safety with its HEMA-free, TPO-free, vegan, and cruelty-free formulation. This 15ml multi-functional product serves as a base coat, foundation gel, nail repair, and strengthener, making it ideal for those with sensitivities or ethical concerns who don’t want to compromise on performance.
What Makes It Stand Out: The clean ingredient profile sets it apart in a market saturated with harsh chemicals. Being HEMA-free significantly reduces the risk of allergic reactions, while the vegan certification appeals to conscious consumers. The clear formula offers universal versatility, working seamlessly under any gel polish color or as a natural nail strengthener.
Value for Money: At $7.99, it’s slightly pricier than competitors, but the premium is justified for the hypoallergenic formula. You’re paying for peace of mind and safety, which is invaluable for sensitive users. The 15ml size provides ample product for multiple applications.
Strengths and Weaknesses: Strengths include exceptional safety profile, clear versatile color, good self-leveling properties, and 21+ day wear time. The brand recommends a 24-hour skin test, demonstrating transparency. Weaknesses: higher price point, lack of color options, and the cautionary skin test might deter some users. Results may vary without proper curing technique.
Bottom Line: Nicedeco is the go-to choice for health-conscious users and those with nail sensitivities. If avoiding HEMA is your priority, this clear, ethical gel justifies its modest premium with superior safety credentials.
9. FZANEST Hema Free Rubber Base Builder Gel For Nails, Rubber Base Coat for Nail Strengthen Apex Building Extension Long Lasting Protect in A Bottle Soak Off UV LED Clear Gel Nail Polish

Overview: FZANEST offers a 6-in-1 clear rubber base builder gel that combines strength, extension capabilities, and a clean formula at an accessible price point. This versatile product functions as a self-leveling builder gel, quick extension gel, nail strengthener, repair treatment, and adhesive, making it a comprehensive solution for DIY nail enthusiasts.
What Makes It Stand Out: The HEMA-free, toxin-free formulation stands out in the budget category, offering cleaner ingredients without the premium price tag. Its high self-leveling formula with built-in brush simplifies creating thickness and shape, making professional-looking extensions achievable for beginners. The intentionally sticky post-cure layer ensures exceptional adhesion between nail and gel layers.
Value for Money: At $6.99, this gel delivers impressive value as a multi-functional, HEMA-free product. It competes with higher-priced clean formulations while offering 6-in-1 versatility. For budget-conscious users wanting safer ingredients, it’s hard to beat.
Strengths and Weaknesses: Strengths include clean ingredient list, excellent self-leveling, easy application, and genuine strengthening for thin nails. The clear formula provides universal versatility. Weaknesses: brand recognition is lower than established competitors, and the sticky residue after curing may confuse novices. Limited to clear color only.
Bottom Line: FZANEST is perfect for beginners and budget-minded users wanting a safer, clear builder gel. Its combination of clean formulation, ease of use, and multi-functionality makes it an excellent entry point into professional-quality DIY nails.
10. VENALISA 3 in 1 Rubber Base Gel For Nails, 12 Colors Jelly Gel Nail Polish Set Nude Pink Neutral Transparent Milky White Sheer Pink Gel Polish Strengthener Kit
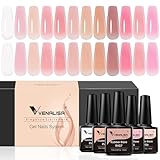
Overview: VENALISA’s 12-color Jelly Gel Nail Polish Set revolutionizes home manicures with its 3-in-1 rubber base gel formulation. This comprehensive kit includes 12 trending nude, pink, milky white, and sheer shades that function as foundation, strengthener, and color polish—eliminating the need for separate base coats entirely.
What Makes It Stand Out: The 12-color selection represents current nail trends perfectly, offering unmatched variety in one package. The unique jelly texture provides a translucent, salon-quality finish that’s difficult to achieve with standard gels. With 28+ days of wear time, it outlasts most competitors significantly. The thicker, wider brush ensures even, streak-free application for beginners.
Value for Money: At $19.99 for 12 bottles, each gel costs under $1.70—a remarkable value compared to individual purchases. The 3-in-1 formula eliminates base coat expenses, while the color curation provides a complete wardrobe for any occasion or season.
Strengths and Weaknesses: Strengths include exceptional color variety, impressive longevity, convenient all-in-one application, and professional-quality results at home. The jelly finish is sophisticated and on-trend. Weaknesses: the 90-120 second cure time is longer than standard, and the set may include shades you won’t use. Requires top coat for best results.
Bottom Line: VENALISA’s set is ideal for nail art enthusiasts wanting maximum color options and convenience. If you regularly do your nails and love nude/neutral tones, this comprehensive kit offers unbeatable value and salon-quality results.
Understanding Rubber Base Gel Technology
What Makes Rubber Base Gels Different?
Rubber base gels represent a significant leap forward in nail chemistry, formulated with specialized oligomers that create a flexible, elastic network once cured. Unlike traditional hard gels that form rigid, glass-like structures, rubber bases incorporate polyurethane methacrylate compounds that maintain a degree of pliability. This molecular structure allows the coating to absorb impact and flex with the natural nail’s movements without compromising adhesion.
The key differentiator lies in the cross-linking density. While standard gels create tight, inflexible bonds, rubber bases develop a more open polymer structure that behaves similarly to rubber bands—stretching under pressure and returning to their original shape. This elasticity dramatically reduces stress at the adhesion line, which is the primary cause of lifting and peeling in traditional systems.
The Science Behind Self-Leveling Properties
Self-leveling isn’t just a marketing buzzword—it’s a precise rheological property engineered through careful control of viscosity and surface tension. Quality rubber base gels contain thixotropic agents that cause the viscosity to temporarily decrease when the product is agitated (brushed onto the nail), then gradually increase as it rests. This allows the gel to flow into a perfectly smooth, even layer that eliminates brush strokes and ridges without pooling in the cuticle area.
The surface tension of these formulations is calibrated to be slightly lower than the energy of a properly prepared nail plate, encouraging the gel to spread uniformly across the surface. This property is particularly crucial for covering imperfections like ridges, pitting, or minor damage, creating a flawless canvas for color application.
Flexible Wear: What It Means for Your Nails
Flexible wear translates to real-world durability that adapts to your lifestyle. When your natural nail flexes—whether from typing, opening cans, or temperature changes—a rubber base gel flexes with it rather than resisting and eventually separating. This symbiotic movement prevents the microscopic cracks that form at the stress points in rigid systems, which eventually propagate into visible lifting.
For clients with naturally flexible or thin nails, this technology is game-changing. Traditional hard gels often create a tension mismatch that can actually cause nail damage over time. Rubber bases work in harmony with your nail’s natural properties, making them ideal for those who’ve experienced breakage or weakening from previous enhancements.
Key Features to Look for in Quality Rubber Base Gels
Viscosity and Consistency
The ideal viscosity for a rubber base gel strikes a delicate balance—thick enough to build structure but fluid enough to self-level effectively. When evaluating products, look for descriptions like “medium viscosity” or “honey-like consistency.” Too runny, and the product will flood cuticles and sidewalls; too thick, and it won’t level properly, leaving visible application marks.
Temperature sensitivity is another critical factor. Premium formulations maintain consistent viscosity across a range of temperatures, ensuring predictable application whether you’re working in a chilly home studio or a warm salon environment. Cheaper alternatives often become unusably thick in cool conditions or runny in heat, making consistent results nearly impossible.
Adhesion Properties
Superior adhesion in rubber base gels comes from a combination of mechanical and chemical bonding. The formula should contain adhesion promoters—typically acidic monomers that gently etch the nail surface and create strong molecular bonds. However, the concentration matters: too aggressive, and you risk nail damage; too mild, and you’ll experience premature lifting.
Look for products that promise “non-acid primers” or “gentle adhesion technology.” These indicate formulations designed to bond effectively without the harsh chemicals that can cause sensitivities. The best rubber bases also incorporate silane coupling agents, which create a bridge between the keratin nail plate and the gel polymer, significantly enhancing bond strength.
Cure Time and Lamp Compatibility
Cure time directly impacts both efficiency and safety. Under-cured gel is the leading cause of allergic reactions and poor durability. Quality rubber base gels specify precise cure times for different lamp types—LED vs. UV—and wattages. Most modern formulations cure in 30-60 seconds under a 48W LED lamp, but this can vary.
Lamp compatibility is non-negotiable. The gel’s photoinitiators must match the light spectrum emitted by your curing lamp. Using mismatched products results in incomplete polymerization, leaving sticky inhibition layers and weak, tacky nails. Always verify that the rubber base gel is compatible with your specific lamp model, or be prepared to invest in a lamp recommended by the manufacturer.
Flexibility and Durability Balance
The sweet spot in rubber base gel design is achieving maximum flexibility without sacrificing wear time. Overly flexible gels can feel soft and wear down quickly, while insufficient flexibility defeats the purpose. Premium formulations use a blend of flexible oligomers with strategic cross-linkers that provide structural integrity.
Look for products that mention “balanced elasticity” or “controlled flexibility.” These indicate formulations tested to withstand daily wear while maintaining that characteristic rubber-like movement. The ideal product should feel slightly pliable when pressed but resist denting or impressions from normal activities.
The Importance of Self-Leveling Formulas
How Self-Leveling Works
Self-leveling action relies on gravity and surface energy to create a perfectly smooth film. When applied, the gel’s viscosity is temporarily lowered through brushing action, allowing it to flow. As it rests, viscosity increases, locking the smooth surface in place before curing. This process typically takes 10-15 seconds, which is why experienced technicians pause briefly before placing the hand in the lamp.
The nail’s surface energy plays a crucial role. Proper preparation—dehydrating the nail plate and removing oils—ensures the gel spreads evenly rather than beading up like water on a waxed car. This is why skipping prep steps destroys the self-leveling effect, no matter how premium the product.
Benefits for Home Users vs. Professionals
For DIY enthusiasts, self-leveling formulas are forgiving of imperfect brush control. They minimize the learning curve, allowing beginners to achieve salon-smooth results without years of practice. The formula essentially corrects minor application errors, making it ideal for those doing their own nails with their non-dominant hand.
Professional technicians benefit from increased speed and consistency. Self-leveling gels reduce application time per client and eliminate the need for extensive filing to smooth out application marks. This efficiency translates to higher client turnover and more predictable results across different nail types and conditions.
Common Application Mistakes to Avoid
The most frequent error is overworking the product. Continually brushing after the initial application disrupts the self-leveling process, introducing air bubbles and preventing proper flow. Apply the gel, make 2-3 smooth strokes to distribute it, then stop and let chemistry do the rest.
Another critical mistake is applying too thick a layer. Self-leveling gels work best in thin to medium coats. Excessive thickness prevents complete curing, as UV light can’t penetrate deeply enough to fully polymerize the bottom layers. This leads to soft, weak nails and potential allergic reactions from uncured monomers.
Rubber Base Gel vs. Traditional Base Coats
Structural Differences
Traditional base coats are thin, rigid primers designed mainly to prevent staining and improve color adhesion. They form a brittle, glassy layer that doesn’t contribute to nail strength. Rubber base gels, conversely, are structural enhancements that add 0.3-0.5mm of flexible reinforcement to the natural nail.
The polymer architecture differs fundamentally. Traditional bases use simple linear polymers that cure into a hard film. Rubber bases employ complex branched oligomers with built-in flex points, creating a three-dimensional network that can deform and recover. This structural difference is why rubber bases can correct minor nail imperfections while traditional bases merely cover them.
When to Choose Which Option
Choose traditional base coats for short-term manicures (under 5 days) or when applying regular polish over healthy, strong nails. They’re also suitable for clients with extremely rigid nails who don’t need flexibility. Traditional bases are quicker to apply and remove, making them ideal for frequent color changers.
Opt for rubber base gels when seeking extended wear (10+ days), needing to strengthen weak or flexible nails, or wanting to create a smooth canvas over ridged or damaged nails. They’re essential for anyone using gel polish systems regularly, as they significantly improve durability and prevent staining.
Cost-Benefit Analysis
While rubber base gels cost 3-5 times more per milliliter than traditional bases, their benefits justify the expense for many users. A single bottle can provide 30-50 applications, and the extended wear time means fewer manicures per year. Factor in the reduced need for repairs and the nail-strengthening benefits, and the cost per wear day often favors rubber bases.
For professionals, the higher product cost is offset by reduced service time and increased client satisfaction. The ability to charge premium prices for rubber base services typically yields better profit margins despite the initial investment.
Application Techniques for Optimal Results
Nail Preparation Essentials
Proper preparation is non-negotiable for rubber base gel success. Begin by gently pushing back cuticles and removing any non-living tissue from the nail plate. Lightly buff the surface with a fine-grit buffer (180-240 grit) to remove shine and create microscopic texture for mechanical adhesion—avoid aggressive filing that thins the nail.
Cleanse thoroughly with a lint-free wipe soaked in alcohol or specialized nail cleanser to remove all dust and oils. Follow with a pH-balancing primer or dehydrator, but avoid acid-based primers unless specifically recommended for your chosen system. The nail should appear matte and completely clean before product application.
The Perfect Application Process
Apply a thin “slip layer” first—a barely-there coat that covers the entire nail and acts as a bonding primer. Cure this layer completely. Then apply your building layer, starting 1mm away from the cuticle and sidewalls to prevent flooding. Use the brush to pull the gel toward the free edge, creating a slight apex in the center for strength.
For self-leveling to work, resist the urge to perfect the surface with your brush. After distributing the gel, hold the finger upside down for 3-5 seconds to allow the gel to settle toward the center, creating a natural apex. Then place it flat for another 5-10 seconds before curing. This technique harnesses gravity to enhance the self-leveling effect.
Curing Protocols
Always follow manufacturer-specified cure times, but understand that lamp age affects output. LEDs lose intensity over time, so a 48W lamp might only deliver 35W after a year of use. When in doubt, add 10-15 seconds to the recommended time, especially for thumbs which receive less direct light.
Cap the free edge by brushing a thin layer of gel over the tip of the nail before curing. This seals the edge and prevents water infiltration that causes lifting. For clients with very flexible nails, consider a “double cure”—cure once, apply a second thin layer, and cure again—to ensure complete polymerization throughout.
Common Troubleshooting Tips
If you experience pooling in the cuticle area, you’re applying too much product or holding the finger incorrectly. Reduce the amount and keep the finger level during the settling period. For uneven self-leveling, check your nail prep—oils or moisture prevent proper flow.
A sticky inhibition layer after curing is normal for many rubber base gels. Remove it with a cleanser after the final cure, not between layers. If the gel remains tacky after cleansing, it’s under-cured—increase your cure time or check lamp compatibility immediately.
Durability Factors and Wear Time
Expected Lifespan of Rubber Base Gels
With proper application and care, quality rubber base gels should deliver 14-21 days of flawless wear. The first 7 days typically show zero lifting or tip wear if applied correctly. By day 14, minor growth at the cuticle becomes visible, but the enhancement should remain securely bonded. Some premium formulations can extend to 3-4 weeks with proper fills.
The actual lifespan depends heavily on nail growth rate, lifestyle factors, and maintenance habits. Fast-growing nails will show regrowth sooner, while those who use their hands aggressively may experience tip wear earlier. The key metric is adhesion integrity—premium rubber bases maintain their bond until removal, while inferior products begin lifting within days.
Factors That Affect Longevity
Nail plate condition is the primary determinant. Oily nail beds, hormonal imbalances, and certain medications can reduce adhesion regardless of product quality. Seasonal changes also impact wear—summer heat and humidity often improve adhesion, while winter dryness can increase lifting.
Application technique dramatically affects results. Skipping prep steps, applying too thick, or under-curing are the top causes of premature failure. Lifestyle factors like frequent hand washing, exposure to harsh chemicals, and manual labor can reduce wear time by 30-50%. Wearing gloves during cleaning tasks can double your manicure’s lifespan.
Signs It’s Time for a Fill or Removal
Visible growth of more than 3mm at the cuticle indicates it’s time for maintenance. If you notice any lifting—even microscopic—address it immediately. Water and bacteria can infiltrate under lifted gel, leading to green nail syndrome and other infections.
Pay attention to stress cracks in the gel surface, which appear as fine lines, usually near the free edge. These indicate the gel is reaching its fatigue limit. Also, watch for color changes or dullness, which can signal product breakdown. Never force worn gel to last beyond 3 weeks, as this increases removal difficulty and nail damage risk.
Removal Process and Nail Health
Safe Removal Techniques
Never peel or pry off rubber base gel—this removes layers of your natural nail along with it. The only safe method is complete soak-off in pure acetone. File the shiny top coat to break the seal, then soak cotton pads in acetone, place them on the nails, and wrap each finger in foil. Wait 15-20 minutes for the gel to soften.
After soaking, gently push off the softened gel with an orange wood stick or metal pusher, using minimal pressure. If any gel resists, re-wrap and soak for another 5 minutes. Forcing removal is where 90% of nail damage occurs. The entire process should be painless and require no pulling or scraping.
Minimizing Damage During Soak-Off
Apply a thin layer of cuticle oil around the nail before soaking to protect the surrounding skin from acetone dryness. Consider using a nail steamer instead of foils—these devices use gentle heat to accelerate removal while keeping acetone exposure to a minimum.
Limit soaking sessions to 20 minutes initially. Extended acetone exposure dehydrates the nail plate excessively. If removal requires multiple rounds, wait 24 hours between sessions and apply nourishing oil to restore moisture. Never file the natural nail surface to “speed up” removal—this thins and weakens nails permanently.
Post-Removal Nail Care
After removal, nails will be temporarily dehydrated and slightly weaker. Apply a keratin-rich nail strengthener daily for one week. Keep nails short during this recovery period to prevent breakage. Massage jojoba or vitamin E oil into the nail plate and cuticles twice daily to restore flexibility and moisture.
Wait at least 48 hours before applying another enhancement. This allows the nail plate’s moisture content to normalize, ensuring better adhesion for your next application. Use this time to assess nail health—if you see significant thinning or damage, extend the break to 1-2 weeks and focus on intensive nail treatments.
Color Options and Customization
Sheer vs. Opaque Formulations
Rubber base gels come in both sheer and opaque varieties, each serving different purposes. Sheer formulations (typically labeled as “nude” or “blush”) allow the natural nail to show through while providing subtle enhancement. These are ideal for natural-looking manicures and clients who prefer understated elegance.
Opaque rubber bases offer full coverage and can replace traditional color polish in a single product. These are perfect for creating bold looks or covering significant nail imperfections. The opacity comes from higher pigment loading, which can slightly reduce flexibility—look for “high-flex” opaque formulas that maintain elasticity despite pigment content.
Building Color with Rubber Base
One of the most versatile techniques is using rubber base as both structure and color. Apply 2-3 thin layers of a sheer rubber base, curing between each, to build custom opacity. This creates a more durable, flexible finish than applying a single thick coat of color polish over a clear base.
For French manicures, use an opaque white rubber base for the free edge and a sheer pink for the nail bed. The rubber base’s self-leveling properties make creating crisp smile lines easier than with traditional gels. You can also create ombre effects by layering different sheer shades, using the self-leveling action to blend them seamlessly.
Mixing and Layering Techniques
Advanced users can mix rubber base gels to create custom colors and opacities. Mix on a palette, not in the bottle, and maintain a 1:1 ratio to preserve the formulation’s balance. Avoid mixing more than two colors, as this can destabilize the polymer system.
Layer different rubber bases for unique effects. A layer of shimmer rubber base under a sheer nude creates depth and dimension. Applying a thin layer of clear rubber base over a color layer can add extra flexibility and extend wear time. Always cure each layer completely before applying the next to prevent inhibition layer interference.
Professional vs. At-Home Use Considerations
Skill Level Requirements
Rubber base gels are more forgiving than traditional hard gels but still require basic technique mastery. Home users need to understand proper nail prep, product control, and curing principles. Expect a 3-5 manicure learning curve before achieving consistent results. Watching tutorial videos and practicing on swatch sticks helps build muscle memory.
Professionals should master advanced techniques like apex placement, stress area reinforcement, and problem nail correction. The investment in education pays off through increased service prices and client retention. Many manufacturers offer certification courses that cover their specific rubber base systems in depth.
Investment in Equipment
At minimum, home users need a quality LED lamp (36W+), basic prep tools, and the rubber base gel itself. Expect to spend $80-150 for a starter kit. Avoid the temptation of cheap, low-wattage lamps—they’ll lead to under-curing and allergic reactions. A good lamp is a one-time investment that pays dividends in safety and results.
Professionals should invest in multiple lamp types, including portable options for mobile services. A high-quality e-file with safety bits speeds up prep and removal but requires training to use safely. Consider also investing in a gel curing tester to verify your lamp’s output regularly, ensuring consistent results for clients.
When to See a Professional
Consult a professional if you have severely damaged nails, chronic lifting issues, or suspected product allergies. Professionals can also perform corrective work for structural problems like ski-jump nails or severe spooning that home application can’t address. If you’ve tried multiple products and consistently experience failure within days, a skilled technician can identify whether the issue is technique, product mismatch, or underlying nail health.
Pregnant clients or those with certain health conditions should seek professional application, as technicians can modify techniques and product choices for safety. Also, if you desire complex nail art or extensions, professional expertise ensures proper structure and longevity.
Price Points and Value Assessment
Understanding Price Tiers
Rubber base gels typically fall into three price categories. Budget options ($8-15 per bottle) often use lower-grade oligomers and may sacrifice flexibility for cost. Mid-range products ($16-28) offer the best value for most users, balancing quality ingredients with reasonable pricing. Premium tier gels ($30-50+) use proprietary formulations, advanced photoinitiators, and often include conditioning additives.
Price doesn’t always correlate directly with performance. Some mid-range products outperform premium options for specific nail types. However, extremely cheap gels often hide costs in reduced wear time, increased allergic potential, and inconsistent batch quality. Consider cost per application rather than bottle price—a $40 bottle that lasts 50 applications is cheaper than a $10 bottle that fails after 5 uses.
What You’re Paying For
Higher-priced rubber bases invest in purer raw materials, reducing the risk of impurities that cause yellowing or allergic reactions. They often feature more sophisticated photoinitiator packages that cure more completely and consistently across different lamp types. Premium brands also invest heavily in stability testing, ensuring the product performs the same from the first drop to the last.
You’re also paying for research and development. Advanced formulations may include keratin peptides, vitamins, or moisture-balancing compounds that improve nail health during wear. The packaging itself matters—airless pumps or opaque bottles prevent premature photoinitiator degradation from light exposure, extending shelf life significantly.
Budget-Friendly vs. Premium Options
Budget-friendly gels can work well for experienced users who understand their specific curing requirements and limitations. They’re excellent for practice and experimentation. However, they often require more precise technique and may not perform consistently across different environmental conditions.
Premium options justify their cost through reliability, extended wear time, and enhanced safety profiles. They typically offer better customer support, detailed educational resources, and batch consistency. For professionals, the premium is a business investment that reduces redo rates and client complaints. For home users with sensitive nails or allergies, premium formulations often provide the only viable solution.
Storage and Shelf Life Best Practices
Proper Storage Conditions
Rubber base gels are sensitive to light, heat, and air exposure. Store bottles in a cool, dark place between 60-75°F (15-24°C). Avoid bathrooms where temperature and humidity fluctuate dramatically. Keep bottles tightly sealed when not in use—exposure to oxygen initiates slow polymerization that thickens the gel and reduces working time.
Never leave bottles near windows or under salon lights. Even ambient light can degrade photoinitiators over months, causing the gel to cure improperly. Consider storing valuable gels in opaque containers or drawers. For professional technicians, a dedicated product fridge set to 65°F can extend shelf life by 30-50%.
Signs of Product Degradation
Thickening or stringiness when brushing indicates the gel is beginning to polymerize prematurely. Separation of components, where liquid pools on top of thicker gel, suggests the formula is breaking down. Color changes, especially yellowing in clear or light-colored gels, signal photoinitiator degradation.
An ammonia or chemical smell stronger than when new indicates monomer evaporation or breakdown. If cured samples become brittle or lose flexibility, the oligomers have likely degraded. Any of these signs mean it’s time to replace the product—using degraded gel risks incomplete curing and allergic reactions.
Maximizing Your Investment
Purchase smaller bottles (7-15ml) if you don’t use the product frequently. While larger bottles offer better per-milliliter pricing, they often expire before you can use them. Write the opening date on each bottle with a permanent marker—most rubber base gels have a 12-24 month shelf life after opening, but this varies by formula.
Avoid “stocking up” during sales unless you can store products properly and will use them within 6-12 months. Unopened bottles stored in ideal conditions maintain potency longer, but still degrade slowly. Rotate stock using the “first in, first out” method to ensure you’re always using the freshest product.
Common Problems and Solutions
Lifting and Peeling Issues
Lifting typically begins at the cuticle or sidewalls and indicates prep failure or product application too close to the skin. Ensure complete removal of cuticle tissue and oils. Apply rubber base gel 1mm away from the cuticle, allowing the self-leveling action to flow slightly closer during the settling period but not touch the skin.
If lifting occurs mid-nail, the issue is likely under-curing or an incompatible lamp. Increase cure time by 15-second increments and verify your lamp’s output. For clients with extremely oily nail beds, incorporate a second prep step with a specialized dehydrator, or extend the air-dry time after prep before applying product.
Bubbling and Imperfections
Bubbles form from over-brushing, which whips air into the gel, or from applying over a damp nail plate. They can also result from shaking the bottle vigorously before use. To prevent bubbles, stir the gel gently by rolling the bottle between your palms. Apply with minimal strokes and ensure nails are completely dry after prep.
If bubbles appear during application, stop immediately. You can sometimes pop surface bubbles with a fine brush dipped in cleanser, but deep bubbles require removal and reapplication. For textured imperfections, the gel may be too thick—warm the bottle slightly in your hands to reduce viscosity, or switch to a thinner formulation.
Discoloration and Yellowing
Yellowing in rubber base gels usually results from UV exposure during wear (a sign of insufficient UV stabilizers in the formula) or from staining by dark polish colors. Always use a dedicated top coat with UV filters. Remove staining by lightly buffing the surface and reapplying a fresh top coat every 7-10 days.
If the base gel itself yellows without color overlay, the product is either expired or low-quality. Switch to a formulation specifically labeled “non-yellowing” or “UV-stabilized.” Some medications and smoking can also cause yellowing from within—this isn’t a product failure but a chemical reaction with the nail plate itself.
Allergic Reactions and Sensitivities
Allergic reactions typically manifest as itching, redness around the nail, or lifting accompanied by soreness. They’re caused by uncured monomers penetrating the skin. The solution is always better curing—ensure your lamp is compatible and powerful enough, and never skip the recommended cure time.
If sensitivities develop, switch to HEMA-free formulas, which use larger monomer molecules that can’t penetrate the skin as easily. Some premium brands offer “hypoallergenic” rubber bases specifically for sensitive clients. Always perform a patch test on new products by applying a small amount to one nail and monitoring for 48 hours before full application.
Trends and Innovations in Rubber Base Gel Technology
Recent Formulation Advances
The latest generation of rubber base gels incorporates bio-based oligomers derived from renewable resources, reducing environmental impact without sacrificing performance. Some formulations now include encapsulated vitamins that release slowly during wear, delivering nutrients directly to the nail plate. “Smart” gels with pH-sensitive adhesion promoters are emerging, which adjust their bonding strength based on the individual’s nail chemistry.
Nanotechnology is making its way into premium formulations, with silica nanoparticles enhancing durability without increasing viscosity. These microscopic reinforcements distribute stress more evenly throughout the gel layer, preventing crack propagation. Some brands are experimenting with self-healing polymers that can repair minor scratches when exposed to body heat.
Eco-Friendly and Non-Toxic Options
The demand for “9-free,” “12-free,” and even “21-free” formulations is driving innovation in rubber base gels. These products eliminate potentially harmful ingredients like formaldehyde, toluene, and certain acrylates without compromising performance. Look for certifications like “Leaping Bunny” for cruelty-free or “ECOCERT” for organic content.
Water-based rubber gels are in development, though they currently lag behind solvent-based formulas in durability. Some brands now use recyclable packaging and offer refill programs to reduce waste. While these eco-options may cost more, they appeal to environmentally conscious consumers and those with extreme chemical sensitivities.
Smart Features and Additives
Temperature-sensitive color-changing rubber bases add a fun element while serving as a curing indicator—some formulations shift color when fully polymerized. Scented gels infused with essential oils aim to mask chemical odors, though purists argue this adds unnecessary compounds. Light-diffusing additives create a soft-focus effect that blurs imperfections more effectively than traditional formulas.
The most promising innovation is the integration of antimicrobial agents that prevent bacterial growth under lifted edges, reducing infection risk. Some experimental formulations even include moisture sensors that change opacity when the nail plate becomes too dry, signaling it’s time for oil application.
Frequently Asked Questions
How long should I realistically expect my rubber base gel manicure to last?
With proper application and care, expect 14-21 days of wear. The first week should be flawless, with only cuticle growth visible by week two. Factors like nail growth rate, lifestyle, and product quality affect longevity. If you’re experiencing lifting within 3-5 days, the issue is likely application technique or product incompatibility rather than the gel itself.
Can I use any LED lamp with my rubber base gel, or do I need a specific brand?
While some rubber base gels are formulated for universal curing, most perform best with specific lamp spectrums. Check the product specifications for recommended lamp wattage and type. Using an underpowered lamp leads to incomplete curing and potential allergic reactions. When in doubt, purchase the lamp recommended by the gel manufacturer or invest in a professional-grade 48W+ LED lamp with adjustable timers.
Why does my rubber base gel still feel sticky after curing?
That sticky layer is called the inhibition layer—a normal byproduct of oxygen interfering with the surface cure. It’s actually protective, preventing dust from sticking during the service. Simply wipe it away with a cleanser after your final cure. If the entire gel feels soft or tacky, not just the surface, it’s under-cured and needs more lamp time.
Are rubber base gels suitable for very weak or damaged nails?
Absolutely—in fact, they’re often superior to hard gels for compromised nails. The flexibility reduces stress on the natural nail, allowing it to grow without cracking. However, severely damaged nails need a recovery period first. Apply a nail hardener daily for one week, then use a thin rubber base layer for support. Avoid building significant structure until the nail plate has regained some integrity.
How do I know if I’m applying too thick a layer?
If the gel pools in your cuticle area, takes longer than 90 seconds to cure, or feels soft and flexible after curing, you’re applying too much. The ideal layer is just thick enough to cover the nail with no visible brush strokes after self-leveling. When in doubt, apply two thin layers rather than one thick one—you’ll achieve better curing and stronger results.
Can rubber base gels be used for extensions or just as a base coat?
Most rubber base gels are designed for overlay only and lack the rigidity needed for extensions beyond 2-3mm of free edge. However, some “building gels” in the rubber base category can support short extensions when used with nail forms. For longer extensions, traditional hard gels or acrylics are still superior. Always check the product description—if it doesn’t mention “extensions,” assume it’s for overlay only.
What’s the difference between a rubber base gel and a rubber top coat?
Rubber base gels prioritize adhesion and flexibility with a slightly tacky inhibition layer for color bonding. Rubber top coats focus on scratch resistance and shine, curing to a hard, non-porous finish. While some products claim to be “base and top in one,” dedicated formulas for each step perform better. Never use a top coat as a base—the lack of adhesion promoters will cause immediate lifting.
How often should I take a break from rubber base gels?
Contrary to popular belief, you don’t need regular breaks if using quality products and proper removal techniques. The key is monitoring nail health. If nails remain flexible, smooth, and free of discoloration, continuous wear is fine. However, if you notice thinning, white spots, or increased brittleness, take a 2-4 week break and focus on nourishing treatments.
Why does my rubber base gel peel off in one piece after a few days?
This indicates a complete adhesion failure, usually from prep issues. The nail plate wasn’t properly dehydrated, or oils weren’t removed. It can also happen if you apply gel over a living cuticle or too close to the skin, creating a lift point. Ensure you’re cleansing with a nail prep solution after buffing, and apply gel 1mm away from the cuticle, allowing it to flow slightly during self-leveling but not touch the skin.
Are HEMA-free rubber base gels really safer?
HEMA (hydroxyethyl methacrylate) is a common allergen in gels because its small molecular size allows it to penetrate skin. HEMA-free formulas use larger monomers that are less likely to cause sensitization, making them statistically safer. However, any uncured gel can cause reactions. Proper curing technique is more important than HEMA content. If you have known sensitivities, HEMA-free is worth the premium price.